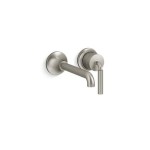
Wall Mount Faucet Installation Kit
Wall-mount faucets are an elegant and stylish upgrade for any bathroom or kitchen. They provide a modern and sleek look, while also offering increased functionality and convenience. Installing a wall-mount faucet may seem like a daunting task, but with the right tools and instructions, it can be a relatively easy DIY project.
Tools and Materials Needed:
- Wall-mount faucet
- Wall-mount faucet installation kit
- Adjustable wrench
- Plumber's putty
- Teflon tape
- Phillips screwdriver
- Hammer
- Level
Step-by-Step Installation Guide:
Step 1: Shut Off Water Supply and Remove Existing Faucet
Begin by turning off the water supply to the faucet using the shut-off valves under the sink. Then, remove the old faucet by unscrewing the mounting hardware and lifting the faucet off the sink.
Step 2: Install Mounting Bracket
Place the mounting bracket for the wall-mount faucet against the wall where you want the faucet to be installed. Use a level to make sure it is straight and mark the mounting holes with a pencil.
Step 3: Drill Holes and Secure Bracket
Using a drill, create holes at the marked locations. Insert the anchors provided in the installation kit into the holes and tap them in with a hammer. Secure the mounting bracket to the wall using the provided screws.
Step 4: Install Diverter Valve
Next, connect the diverter valve to the water supply pipes using Teflon tape. The diverter valve will allow you to switch between the faucet and any other water sources, such as a shower or bidet.
Step 5: Connect Supply Lines
Connect the supply lines from the diverter valve to the wall-mount faucet using the flexible hoses provided in the kit. Make sure to tighten the connections securely.
Step 6: Install Faucet on Bracket
Gently lift the faucet and position it over the mounting bracket. Align the holes in the faucet with the mounting posts and insert the provided bolts. Tighten the bolts to secure the faucet to the bracket.
Step 7: Seal Faucet Base
Apply a generous bead of plumber's putty around the base of the faucet where it meets the wall. This will help prevent water leaks.
Step 8: Install Handles
If your wall-mount faucet has separate handles, insert the handles onto the valves and secure them with the provided screws.
Step 9: Turn on Water Supply and Check for Leaks
Turn on the water supply and check for any leaks. If you notice any leaks, tighten the connections or apply additional plumber's putty.
Additional Tips:
- For concealed plumbing, drill a hole in the wall behind the mounting bracket to run the supply lines through.
- If the wall-mount faucet requires an electrical connection, make sure to follow the manufacturer's instructions carefully.
- Consider hiring a professional plumber if you encounter any difficulties during the installation process.

Royal Series Wall Mounting Kit For Mount Faucets Pre Rinse Units Krowne

Regency Wall Mount Faucet Installation Kit 1 2 Npt Inlet

Aquaterior Wall Mount Faucet Installation Kit For Sink Backsplash Wal Com

Aquaterior Wall Mount Faucet Installation Kit For Sink Backsplash Wal Com

T S Brass B 0230 K Wall Mounted Faucet Installation Kit

Faucet Installation Kit Wall Mounting For

Moon Matte Black Installation Kit For Connecting Hose Exposed Faucet Outdoor Shower System Thermostatic Mixing

Installation Kit For Wall Mount Faucet Backsplash Mounted Faucets Conn Gotonovo

Aquaterior Wall Mount Faucet Installation Kit For Sink Backsplash Wal Com

Installation Kit For Wall Mount Faucet Backsplash Mounted Faucets Conn Gotonovo