Bose Smart Ultra Soundbar Wall Mount: A Comprehensive Guide
The Bose Smart Ultra Soundbar is a premium audio device designed to deliver immersive, high-fidelity sound. To fully optimize its performance and aesthetics within a listening environment, proper mounting is crucial. While the soundbar can be placed on a media console, wall mounting offers several advantages, including space saving, improved sound projection, and a cleaner, more streamlined appearance. This article provides a comprehensive guide to the Bose Smart Ultra Soundbar wall mount, covering essential considerations, installation procedures, compatible mounts, and troubleshooting common issues.
Choosing to wall mount the Bose Smart Ultra Soundbar is a strategic decision that requires careful planning and execution. It is not merely a superficial aesthetic choice but impacts the overall audio experience and the longevity of the soundbar itself. Proper installation ensures that the soundbar is securely positioned, minimizing vibrations and potential damage. Furthermore, accurate placement optimizes the projection of sound waves into the room, contributing to a more balanced and immersive audio experience.
Prior to commencing the installation process, a thorough understanding of the wall's structural integrity is paramount. Different wall types – drywall, plaster, brick, or concrete – require different mounting hardware and techniques. Ignoring this crucial step can lead to inadequate support, posing a risk to the soundbar and potentially causing damage to the wall itself.
Key Considerations Before Installation
Before initiating the wall mounting process, several key factors must be carefully evaluated. These considerations encompass the selection of an appropriate mounting bracket, the assessment of wall integrity, the determination of optimal soundbar placement, and the management of cable connections. Each aspect plays an integral role in ensuring a successful and safe installation.
Firstly, selecting the right wall mount bracket is essential. Consider compatibility with the Bose Smart Ultra Soundbar model, weight capacity, and adjustability options. Bose typically offers a dedicated wall mount bracket designed specifically for its soundbars, ensuring a secure and seamless fit. Third-party mounts are also available, but compatibility should be carefully verified. A mount with some degree of tilt or swivel adjustability can be beneficial for optimizing the sound direction.
Secondly, the wall's structural integrity must be assessed. Drywall alone is generally insufficient to support the weight of the soundbar. Locating wall studs is crucial, as these provide solid anchor points for the mounting bracket. A stud finder can be used to accurately identify stud locations. For walls made of brick or concrete, specialized masonry anchors are required to ensure a secure and stable installation. If unsure about the wall's load-bearing capacity, consulting a professional installer is highly recommended.
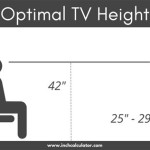
Thirdly, determining the optimal soundbar placement is critical for achieving the best audio performance. The recommended height is typically slightly below the television screen, allowing for clear audio projection without obstruction. Consider the viewing angle and listening position when determining the ideal height. Experimenting with different positions before final mounting can help fine-tune the audio experience. Ensure the soundbar is level for optimal sound dispersion.
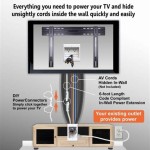
Fourthly, cable management should not be overlooked. Plan for the routing of power cables, HDMI cables, and any other necessary connections. Use cable ties or concealers to maintain a clean and organized appearance. Ensure that cables are not stretched or kinked, as this can affect signal quality and potentially damage the cables. Consider using in-wall cable management solutions for a truly seamless and clutter-free installation.
Step-by-Step Installation Procedure
The installation of the Bose Smart Ultra Soundbar wall mount involves a series of meticulous steps, each contributing to the stability and functionality of the setup. This process requires precision and adherence to safety guidelines to ensure a successful outcome.
The first step is to gather all necessary tools and materials. This includes the chosen wall mount bracket, a stud finder (if applicable), a level, a drill with appropriate drill bits for the wall type, a screwdriver, a measuring tape, a pencil, and safety glasses. Having all the tools readily available will streamline the installation process and prevent unnecessary delays.
The second step involves locating the wall studs (if applicable) using a stud finder. Mark the stud locations with a pencil. If the wall is made of brick or concrete, use a masonry drill bit to create pilot holes for the appropriate anchors. Ensure the pilot holes are deep enough and accurately positioned to accommodate the anchors.
The third step is to attach the mounting bracket to the wall. Align the bracket with the marked stud locations or pilot holes. Use screws or masonry anchors to securely fasten the bracket to the wall. Ensure the bracket is level using a level tool. Double-check the stability of the bracket by applying slight pressure to ensure it is firmly attached to the wall.
The fourth step involves attaching the soundbar to the mounting bracket. Carefully align the soundbar with the corresponding mounting points on the bracket. Secure the soundbar using the screws provided with the mount. Ensure the soundbar is firmly attached to the bracket and that there is no wobble or movement.
The fifth step concerns cable management. Connect all necessary cables to the soundbar, including the power cable, HDMI cable, and any other audio cables. Route the cables neatly and securely using cable ties or concealers. Ensure that cables are not obstructing the soundbar's speakers or sensors. Conceal the cables behind the soundbar or within the wall for a cleaner appearance.
The sixth and final step is to test the soundbar. Power on the soundbar and verify that it is functioning correctly. Adjust the soundbar's position, if necessary, to optimize the audio experience. Fine-tune the sound settings to your preference. Once you are satisfied with the sound quality and the overall installation, the process is complete.
Troubleshooting Common Issues
During the wall mounting process, unforeseen issues may arise. Addressing these challenges effectively ensures a smooth and successful installation. This section provides solutions to common problems encountered during the procedure.
One common issue is difficulty locating wall studs accurately. If a stud finder is unreliable, try using a small nail to probe for studs. Look for electrical outlets or switches, as these are typically attached to studs. If still unable to locate studs, consider using drywall anchors as a last resort, but be aware that these have a lower weight capacity than stud-mounted screws.
Another frequent issue is stripped screw holes. If a screw hole becomes stripped, try using a larger screw or filling the hole with wood glue and toothpicks before re-drilling. Alternatively, relocate the mounting bracket slightly to a new location on the wall.
Cable management problems are also common. If cables are too short, use cable extenders. If cables are unsightly, use cable concealers or in-wall cable management solutions. Ensure that cables are not kinked or stretched, as this can affect signal quality.
If the soundbar is not level after installation, use shims to adjust the mounting bracket. Loosen the screws, insert shims between the bracket and the wall, and then re-tighten the screws. This will help to level the soundbar and ensure optimal sound dispersion.
Finally, if the soundbar is vibrating excessively, check the tightness of all screws and connections. Ensure that the mounting bracket is securely attached to the wall. Consider using vibration-dampening pads between the soundbar and the bracket to reduce vibrations.
By carefully considering these factors, following the installation procedure, and addressing potential issues effectively, the Bose Smart Ultra Soundbar can be successfully wall mounted, resulting in an enhanced audio experience and a visually appealing home entertainment setup. The strategic placement and secure installation contribute significantly to the soundbar’s performance and longevity, making the wall mounting process a worthwhile endeavor.

Bose Soundbar Wall Bracket Mounting A

Bose Wb 120 Wall Mount Kit

Bose Soundtouch 300 Mounting To A Wall Youtube

Bose Soundbar Wall Bracket

Bose Soundbar Wall Bracket Black Best Canada

Bose S Ultra Soundbar Review Rtings Com

Bose Soundbar Wall Bracket Black Jb Hi Fi

Bose S Ultra Soundbar

Bose S Ultra Soundbar Review Pcmag

Bose S Ultra Soundbar Review Dolby Atmos And Ai Enriched Tv Sound Tom Guide