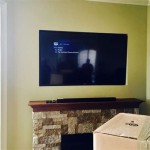
How To Install a TV on a Wall Mount: A Comprehensive Guide
Mounting a television on a wall offers numerous benefits, including space saving, improved viewing angles, and a cleaner aesthetic. However, the process requires careful planning, precision, and the right tools to ensure a safe and secure installation. This guide provides a detailed, step-by-step approach to installing a TV on a wall mount, covering everything from preparation to final adjustments.
Preparing for Installation: Gathering Materials and Assessment
Before commencing the installation, it's crucial to gather all necessary materials and thoroughly assess the wall structure. A well-prepared workspace minimizes errors and ensures a smooth execution.
Tools and Materials Required:
A crucial first step is gathering all the necessary tools and materials. This includes:
* Wall Mount: Select a mount compatible with the TV's size and weight. Confirm the mount's Vehicle Mounting Standards Association (VESA) compatibility with the TV. Different mounts exist, including fixed, tilting, and full-motion options, each with varying degrees of flexibility. Choose the one that best suits viewing needs. * Stud Finder: Essential for locating wall studs, which provide the necessary structural support. Electronic stud finders are generally more accurate than magnetic ones. * Drill: A power drill with various drill bits is needed for creating pilot holes and securing the mount to the wall. * Level: A level ensures the TV is mounted straight. A bubble level or laser level can be used. * Screwdriver: A screwdriver set with Phillips head and flathead options is necessary for attaching the mounting brackets to the TV. * Socket Wrench or Adjustable Wrench: Used for tightening lag bolts that secure the mount to the wall studs. * Measuring Tape: Needed for accurate measurements and centering the TV. * Pencil: For marking locations for drilling and mounting. * Safety Glasses: To protect eyes from debris during drilling. * Work Gloves: To provide a better grip and protect hands. * Cable Management Solutions: Cable ties, cord concealers, or in-wall cable management kits to organize and hide wires. * Voltage Tester (Optional): If running cables behind the wall, a voltage tester can confirm that there are no live electrical wires in the area.Wall Assessment:
Before initiating any drilling or mounting, it is essential to determine the wall's composition. The wall type will dictate the appropriate mounting hardware and installation techniques.
* Drywall: Drywall, also known as sheetrock, is a common wall material. It is relatively easy to work with, but it requires mounting brackets to be secured to wall studs for sufficient support. Using drywall anchors without studs is generally not recommended for larger, heavier TVs. * Plaster: Plaster walls can be more challenging to work with than drywall due to their thickness and tendency to crumble. Pre-drilling pilot holes is crucial when working with plaster to prevent cracking. * Concrete or Brick: These materials require specialized drill bits (masonry bits) and anchors designed for concrete or brick. It's important to use the correct type of anchor to ensure a secure and stable mount. * Locating Wall Studs: Use a stud finder to accurately locate the wall studs. Mark the center of each stud with a pencil. The distance between studs is typically 16 inches or 24 inches on center. Double-check the stud locations by drilling small pilot holes to confirm the wood before proceeding. * Checking for Obstructions: Before drilling, ensure there are no electrical wires or plumbing pipes behind the wall where the mount will be installed. If unsure, consult a professional.TV Preparation:
Preparing the television itself involves attaching the mounting brackets to the back of the TV. These brackets are then attached to the wall mount. The VESA (Video Electronics Standards Association) standard defines the mounting hole pattern on the back of TVs.
* Identifying VESA Pattern: Refer to the TV's manual or measure the distance between the mounting holes on the back of the TV to determine the VESA pattern. This pattern will determine the size and type of mounting screws needed. * Attaching Mounting Brackets: Attach the mounting brackets to the back of the TV using the appropriate screws. Ensure the brackets are aligned properly and securely fastened. Do not overtighten the screws, as this can damage the TV.Mounting the Wall Plate: Ensuring Secure and Level Installation
The wall plate is the part of the mount that attaches directly to the wall. Its secure and level installation is paramount for the overall stability and safety of the mounted TV.
Positioning the Wall Plate:
Determine the desired height for the TV and mark the location of the wall plate on the wall. Consider the viewing angle and the height of furniture in the room. Use a level to ensure the wall plate is aligned horizontally.
Securing the Wall Plate to Studs:
Align the wall plate with the marked stud locations. Use a drill to create pilot holes through the wall plate and into the studs. Secure the wall plate to the studs using lag bolts and a socket wrench or adjustable wrench. Ensure the lag bolts are tightened securely to prevent the mount from shifting.
Using Anchors for Non-Stud Mounting (If Necessary):
If a stud cannot be located at the desired mounting location, use heavy-duty drywall anchors designed for the weight of the TV. Follow the anchor manufacturer's instructions carefully. Drill pilot holes according to the anchor size, insert the anchors, and then secure the wall plate to the anchors.
Verifying Level and Stability:
After securing the wall plate, use a level to double-check its horizontal alignment. Ensure the wall plate is firmly attached to the wall and does not wobble. If any instability is detected, re-tighten the lag bolts or anchors and reassess.
Hanging the TV and Cable Management: Completion and Final Adjustments
With the wall plate securely mounted and the brackets attached to the TV, the final step involves lifting and attaching the TV to the wall plate, followed by cable management and fine-tuning.
Lifting and Attaching the TV:
This step may require assistance, depending on the size and weight of the TV. Carefully lift the TV and align the mounting brackets with the wall plate. Secure the TV to the wall plate using the appropriate screws or locking mechanism, as specified by the mount's instructions.
Cable Management:
Managing cables is crucial for a clean and organized appearance. Several options exist for cable management, including:
* Cable Ties: Use cable ties to bundle and organize the cables behind the TV. * Cord Concealers: Cord concealers are plastic channels that attach to the wall and hide the cables. * In-Wall Cable Management Kits: These kits allow cables to be run inside the wall for a completely clean look. This option typically requires cutting holes in the wall and running cables between them. * Routing Cables: Route the cables neatly and securely to prevent them from being visible or becoming tangled.Final Adjustments and Testing:
Once the TV is mounted and the cables are managed, perform the following checks and adjustments:
* Viewing Angle: Adjust the TV's viewing angle to ensure optimal viewing from all seating positions. If using a tilting or full-motion mount, experiment with different angles. * Cable Connections: Verify that all cables are securely connected to the TV and other devices. * Power On and Testing: Power on the TV and test all inputs to ensure they are working correctly. Check the picture quality and audio settings. * Final Level Check: Recheck the level of the TV to ensure it is perfectly straight. Make any necessary adjustments. * Clean Up: Clean the surrounding area and dispose of any packaging materials. Store the remaining hardware and tools in a safe place.By following these steps carefully and methodically, a television can be safely and effectively mounted on a wall, enhancing the viewing experience and improving the room's overall aesthetics. It's important to prioritize safety throughout the process and to consult a professional if unsure about any aspect of the installation.

How To Wall Mount A Tv Step By Guide Cabletv Com

How To Guide Wall Mounting A Tv Merchanting

Installing A Tv Mount Into Metal Studs Kanto Solutions

Tv Wall Mount Installation Mounted

How To Install A Tv Wall Mount Tips From The Pros Firefold

Hang Up Your Tv And Mount In 4 Steps Coolblue Anything For A Smile

Before You Install Tv Wall Mount 7 Things Need To Know

Diy How To Install A Tv Wall Mount Youtube

The 4 Best Tv Wall Mounts Of 2024 Reviews By Wirecutter

The Dos And Don Ts Of Mounting An Outdoor Tv Money