Large Digital Photo Frame Wall Mount: A Comprehensive Guide
The integration of technology into home décor has led to innovative solutions like the large digital photo frame. These devices offer a dynamic way to display cherished memories, artwork, or even functional information. Choosing the right mounting solution is crucial for optimizing the aesthetic appeal and functionality of these large-format displays. A wall mount provides a secure and elegant option for showcasing a large digital photo frame, freeing up valuable surface space and creating a visually appealing centerpiece.
This article will explore the various aspects of large digital photo frame wall mounts, including types, selection criteria, installation considerations, and troubleshooting common issues. The objective is to provide a comprehensive understanding to assist in making informed decisions when incorporating a large digital photo frame into a living space or commercial environment.
Types of Wall Mounts for Large Digital Photo Frames
Selecting the appropriate wall mount is the foundation for a successful installation. Several types of mounts cater to different scenarios and aesthetic preferences. Understanding the nuances of each type allows for a tailored approach that addresses specific needs and limitations.
Fixed Mounts: Fixed mounts, as the name suggests, hold the digital photo frame in a stationary position. They are often the simplest and most cost-effective option. These mounts typically consist of two brackets – one attaching to the wall and the other to the back of the frame. The frame then hangs securely on the wall bracket. Fixed mounts are ideal when the viewing angle is consistent and adjustability is unnecessary. Their simplicity also translates to ease of installation, making them a popular choice for DIY enthusiasts.
Tilting Mounts: Tilting mounts offer a degree of vertical adjustability. This allows for slight adjustments to the viewing angle, which can be beneficial in mitigating glare from sunlight or overhead lighting. The tilting mechanism can be simple, often involving a ratcheting system or a friction-based hinge. Tilting mounts are a good compromise between fixed mounts and more complex articulating models, offering some flexibility without a significant increase in cost or installation complexity. They are particularly useful when the frame is mounted higher on the wall, allowing for downward tilting to optimize the viewing experience.
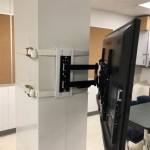
Articulating Mounts: Articulating mounts, also known as full-motion mounts, provide the greatest degree of flexibility. These mounts feature multiple joints or arms that allow the frame to be swiveled, tilted, and extended away from the wall. This versatility is advantageous in situations where the viewing angle needs to be adjusted frequently, or when the frame needs to be positioned in a variety of orientations. Articulating mounts are generally more expensive and require more complex installation than fixed or tilting mounts. However, the added flexibility can be invaluable in dynamic environments or when the frame serves multiple purposes, such as displaying information to different audiences or in varying lighting conditions.
Flush Mounts: These mounts are designed to keep the digital photo frame as close to the wall as possible. They minimize the gap between the frame and the wall surface, creating a clean and streamlined look. Flush mounts are ideal for situations where a minimalist aesthetic is desired. However, they typically offer no adjustability and can be more challenging to install than other types of mounts, as there is less room for maneuvering during the installation process.
Recessed Mounts: Recessed mounts involve cutting an opening in the wall to accommodate the digital photo frame. This results in a seamless integration of the frame into the wall, creating a custom and high-end look. Recessed mounts require more extensive preparation and are typically best suited for new construction or remodeling projects. They can also involve additional considerations, such as ensuring proper ventilation to prevent overheating of the frame's electronics.
Key Considerations for Selecting a Wall Mount
Beyond the type of mount, several other factors influence the selection process. These considerations relate to the size and weight of the digital photo frame, the wall type, and the desired aesthetic outcome.
Weight Capacity: The most critical factor is the weight capacity of the wall mount. It is imperative to select a mount that is rated to safely support the weight of the digital photo frame. Exceeding the weight capacity can lead to mount failure, potentially damaging the frame and the wall. Always consult the manufacturer's specifications for both the frame and the mount to ensure compatibility. It is generally advisable to choose a mount with a weight capacity that exceeds the frame's weight by a comfortable margin, providing an extra safety factor.
VESA Compatibility: VESA (Video Electronics Standards Association) is a standard that defines the mounting interface on the back of many digital photo frames and displays. The VESA standard specifies the distance between the mounting holes in millimeters. The wall mount must be compatible with the VESA pattern on the back of the frame. If the frame does not have a VESA mounting pattern, an adapter plate may be required. Checking VESA compatibility is crucial to ensure that the mount can be securely attached to the frame.
Wall Type: The type of wall to which the frame will be mounted significantly impacts the installation process and the type of hardware required. Common wall types include drywall, plaster, concrete, and brick. Drywall is the most common wall type in residential construction, but it is also the weakest. When mounting a heavy digital photo frame to drywall, it is essential to use appropriate anchors that can distribute the weight over a larger area. Concrete and brick walls are much stronger but require specialized drilling equipment and anchors. Plaster walls can be brittle and prone to cracking, so extra care is needed during installation. Understanding the wall type is essential for selecting the correct mounting hardware and ensuring a secure and stable installation.
Aesthetic Considerations: The visual appearance of the wall mount should complement the digital photo frame and the surrounding décor. Mounts are available in various finishes, such as black, silver, and white. The color and style of the mount should blend seamlessly with the frame and the wall. Additionally, consider the visibility of the mount itself. Some mounts are designed to be hidden behind the frame, while others are more visible. The choice depends on personal preference and the desired aesthetic.
Cable Management: Digital photo frames require power and may also need to be connected to a network for updates or content streaming. Effective cable management is essential for maintaining a clean and organized appearance. Some wall mounts include built-in cable management features, such as channels or clips for routing cables. Alternatively, cable concealers can be used to hide cables running along the wall. Proper cable management contributes significantly to the overall aesthetic and prevents unsightly dangling wires.
Installation and Troubleshooting
Proper installation is paramount for ensuring the safety and longevity of the mounted digital photo frame. Following these steps will help ensure a successful installation.
Planning and Preparation: Before beginning the installation process, carefully plan the placement of the digital photo frame. Consider the viewing angle, lighting conditions, and the availability of power outlets. Gather all necessary tools and materials, including a level, stud finder, drill, screwdriver, anchors, and mounting hardware. Read the instructions provided by the manufacturer of both the frame and the mount thoroughly.
Locating Wall Studs: For drywall installations, it is ideal to mount the frame directly to wall studs. Studs provide a solid anchor point and can support significantly more weight than drywall alone. Use a stud finder to locate the studs behind the wall. Mark the location of the studs clearly. If it is not possible to mount the frame to studs, use appropriate drywall anchors that are rated to support the weight of the frame. Consult with a hardware professional if unsure about the proper anchor selection.
Mounting the Bracket: Attach the wall bracket to the wall, ensuring that it is level and securely fastened. Use appropriate screws and anchors based on the wall type. Double-check the alignment of the bracket before tightening the screws. If using drywall anchors, follow the manufacturer's instructions carefully. Over-tightening screws can damage the wall and compromise the integrity of the mount.
Attaching the Frame: Attach the mounting brackets to the back of the digital photo frame, ensuring that they align with the VESA mounting holes. Use the correct size screws to avoid damaging the frame's internal components. Carefully lift the frame and align it with the wall bracket. Secure the frame to the wall bracket using the appropriate fasteners. Double-check that the frame is securely attached and level before releasing it.
Cable Management: Route the power cable and any other necessary cables through the cable management system, if available. Use cable ties or clips to secure the cables and prevent them from dangling. Connect the power cable to a nearby outlet. Consider using a surge protector to protect the frame from power surges.
Troubleshooting Common Issues: Several issues can arise during or after the installation process. One common issue is a wobbly frame. This can be caused by loose screws or improper anchor installation. Tighten the screws and double-check the anchor installation. If the frame is still wobbly, consider using additional anchors or shims to stabilize it. Another common issue is difficulty with cable management. If the cables are difficult to conceal, consider using cable concealers or running the cables inside the wall. Always consult with a qualified electrician before running cables inside the wall to ensure compliance with local building codes.
By carefully considering the type of wall mount, the weight capacity, VESA compatibility, wall type, aesthetic considerations, and cable management, a large digital photo frame can be securely and elegantly mounted on the wall, transforming a living space or commercial environment.

5 Reasons To Hang A Wall Mounted Large Digital Photo Display In Your Home Nimbus Frames

How Josh Built A Large Digital Picture Frame With 3 2 Aspect Ratio Which Is Perfect For All Dslr Photographers Thedigitalpictureframe Com

Large Size Wall Mount Digital Art Photo Frame Nft 21 5 Inch Advertising With Wifi Picture And Made In China Com

Whole Hd Display 10 Inch Wall Mount Android Big Size Large Digital Photo Frame And Made In China Com

Read This Before You Go Out And Samsung S The Frame As An Ultra Large Digital Picture Thedigitalpictureframe Com

15 Inch Wifi Digital Photo Frame Wall Mounted Led Screen Large Pictu Sd3 Australia

Digital Picture Frame 15 6 Inch Large Photo With 1920 1080 Ips Full Hd Touchscreen Humblestead 32gb Wifi S Share Photos And

Large Digital Picture Frame 17 Inch Photo Wall Mounted Wifi S Frames Remote Control Auto Rotate Motion Sensor Share Photos And Via Email Or App Unlimited Cloud Storage Newegg Com

10 1 Inch Large Mini Wall Mount Digital Art Photo Frame Wifi S Display Screen Picture With Weather Station And Full Hd 1080p

Large Digital Picture Frame Best In Singapore Sep 2024 Lazada Sg