Selecting the Right Wall Mount for Your 75-Inch Hisense TV
Mounting a 75-inch Hisense television on the wall is an advantageous method for maximizing space, enhancing viewing angles, and creating a more modern aesthetic within a room. However, selecting the appropriate wall mount for such a large and valuable appliance requires careful consideration of several factors. This article provides a comprehensive guide to navigating the complexities of choosing the best wall mount option, ensuring secure installation and optimal viewing experience.
The market offers a diverse array of wall mount types, each designed to cater to specific needs and preferences. Understanding the distinctions between these types is paramount to making an informed decision. Considerations must extend beyond simple compatibility, encompassing factors such as weight capacity, adjustability, and ease of installation.
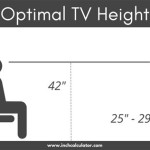
Furthermore, preparation is critical. Before purchasing a wall mount, assessing wall composition, stud location, and desired viewing height is essential. A thorough understanding of these aspects will not only streamline the installation process but also prevent potential structural issues and ensure the long-term stability of the mounted television.
Key Considerations for 75-Inch Hisense TV Wall Mounts
Several primary factors dictate the appropriate choice of a wall mount for a 75-inch Hisense television. These include the weight and VESA compatibility of the television, the type of wall it will be mounted on, and the desired degree of adjustability. Neglecting any of these areas can lead to instability, damage to the television, or an unsatisfactory viewing experience.
The weight of the television is perhaps the most crucial factor. Exceeding the weight capacity of the wall mount poses a significant safety risk. The manufacturer's specifications for the television's weight, typically found in the user manual or online product information, should be carefully checked and compared to the wall mount's listed weight capacity. It is always prudent to select a mount with a capacity that exceeds the television's weight by a reasonable margin, providing an extra layer of safety and accounting for potential future variations.
VESA (Video Electronics Standards Association) compatibility refers to the standardized mounting hole pattern on the back of the television. These holes are arranged in a rectangular pattern, with the distance between the holes measured in millimeters. Hisense televisions, including 75-inch models, adhere to VESA standards, but the specific VESA size varies depending on the model. Determining the VESA size is essential to ensuring that the wall mount aligns correctly with the mounting holes. This information is typically available in the television's specifications. Wall mounts are often advertised with the range of VESA sizes they support, allowing for easy matching to the television's requirements.
Finally, the type of wall the television will be mounted on significantly impacts the installation process and the type of mounting hardware required. Walls constructed of drywall over wood studs necessitate the use of stud finders to locate load-bearing studs. Mounting the television directly to drywall without anchoring to studs is highly discouraged due to the risk of the television detaching from the wall. Concrete or brick walls require specialized anchors and drilling equipment to ensure a secure and stable installation. Identifying the wall type is a crucial first step in selecting both the appropriate wall mount and the necessary installation tools and hardware.
Types of Wall Mounts and Their Applications
The market offers three primary types of wall mounts: fixed, tilting, and full-motion. Each type offers distinct advantages and disadvantages, making them suitable for different viewing needs and room configurations. Understanding these differences is critical to selecting the mount that best aligns with specific preferences.
Fixed wall mounts provide the simplest and most streamlined installation. They hold the television flush against the wall, offering a clean and minimalist aesthetic. While they do not offer any adjustability in terms of tilt or swivel, they are often the most affordable and easiest to install. Fixed mounts are best suited for situations where the viewing angle is already optimal and where minimal adjustability is required. They are a good option for bedrooms or dedicated home theater rooms where the seating arrangement is fixed and the television is at eye level.
Tilting wall mounts allow for a slight vertical adjustment of the television screen. This feature can be beneficial in reducing glare from overhead lighting or improving the viewing angle from a higher seating position. The tilting range is typically limited to a few degrees, but this can be sufficient to make a noticeable difference in viewing comfort. Tilting mounts offer a compromise between the simplicity of fixed mounts and the full adjustability of full-motion mounts. They are a suitable choice for living rooms or bedrooms where there may be variations in seating height or potential glare issues.
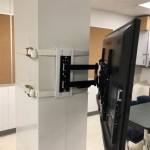
Full-motion wall mounts, also known as articulating wall mounts, offer the greatest flexibility in terms of adjustability. They allow the television to be tilted, swiveled, and extended away from the wall, providing a wide range of viewing angles. This type of mount is particularly useful in rooms with multiple viewing positions or where the television needs to be angled to accommodate different activities. Full-motion mounts are more complex to install and typically more expensive than fixed or tilting mounts, but their versatility can be a worthwhile investment. They are ideal for kitchens, living rooms, or other spaces where viewing angles may vary significantly.
Installation Considerations and Best Practices
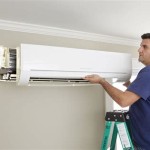
Proper installation of a wall mount is critical to ensuring the safety of the television and the stability of the mounting. It is essential to follow the manufacturer's instructions carefully and to use appropriate tools and hardware. If unsure about any aspect of the installation process, it is recommended to seek professional assistance.
Before beginning the installation, it is crucial to gather all the necessary tools and materials. These typically include a stud finder (for drywall over wood stud walls), a level, a drill, appropriate drill bits, a screwdriver, a measuring tape, and safety glasses. The wall mount itself should include all the necessary screws, washers, and spacers. However, it may be necessary to purchase additional hardware depending on the wall type and the specific mounting requirements.
The first step in the installation process is to locate the wall studs, if applicable. A stud finder can be used to identify the edges of the studs behind the drywall. Mark the location of the studs clearly and verify their alignment with a level. If mounting on concrete or brick, use a masonry drill bit to create pilot holes for the anchors. Ensure that the anchors are appropriate for the weight of the television and the type of wall material.
Next, attach the mounting brackets to the back of the television using the appropriate screws and spacers. Align the brackets with the VESA mounting holes and ensure that they are securely fastened. The brackets should be flush against the back of the television, and there should be no gaps or looseness. Once the brackets are securely attached to the television, lift the television and carefully align the brackets with the wall plate, which should already be securely mounted to the wall studs or concrete/brick anchors.
Finally, use the appropriate screws to attach the television to the wall plate. Double-check that all screws are tightened securely and that the television is level. If using a tilting or full-motion mount, adjust the tilt and swivel angles to the desired positions. Perform a final inspection to ensure that the television is securely mounted and that there are no loose connections or signs of instability.
Following these guidelines will significantly increase the chances of a successful and safe wall mount installation for a 75-inch Hisense television. Remember to prioritize safety, meticulously follow instructions, and seek professional assistance when needed. A properly installed wall mount will provide years of enjoyment and enhance the viewing experience significantly.
Ultimately, the selection of a wall mount for a 75-inch Hisense television is a process that necessitates careful planning, meticulous research, and attention to detail. By thoroughly evaluating the various factors outlined above, individuals can confidently choose a wall mount that meets their specific needs and ensures both the safety and longevity of their valuable television.

Hisense 75 Tv Install Review

Secu Tilt Tv Wall Mount For 40 42 46 47 50 55 60 65 70 75 Inch Led Lcd Plasma Panasonic Sharp Vizio Lg Sony Aquas Sceptre Hisense Sanyo

Mounting Dream Ul Listed Tv Wall Mount For Most 42 84 Inch Full Motion With Swivel And Tilt Bracket Articulating Dual Arms Fits Md2617

Premium Tv Wall Mount Fits Sony Samsung Vizio Tcl Hisense Lg 50 55 65 70 75 80

Tilt Tv Wall Mount Bracket For Hisense Toshiba Tcl Lg 43 50 55 65 70 75 77 80

Secu Tilt Tv Wall Mount For 40 42 46 47 50 55 60 65 70 75 Inch Led Lcd Plasma Panasonic Sharp Vizio Lg Sony Aquas Sceptre Hisense Sanyo

The 4 Best Tv Wall Mounts Of 2025 Reviews By Wirecutter

Full Motion Tv Wall Mount Tilting Swivel For Hisense 32 40 43 50 55 60 65 Inch

Hisense 75 Class U7 Series Mini Led 4k Uhd Qled S Google Tv 2024 75u7n Best

Full Motion Tv Wall Mount For Samsung Lg Sony Vizio Hisense 50 55 60 65 70 75 80