Wall Mounting Your TV and Cable Box: A Comprehensive Guide
Wall mounting a television and cable box is a popular home improvement project that offers numerous aesthetic and functional benefits. Beyond creating a cleaner, more modern look, it can also save space, improve viewing angles, and protect the equipment from accidental damage. However, the process requires careful planning, the right tools, and a clear understanding of safety precautions to ensure a successful and secure installation.
This article will provide a comprehensive guide to wall mounting your TV and cable box, covering everything from selecting the appropriate mounting hardware to concealing cables for a professional finish. It will outline the necessary steps and considerations to ensure a safe and visually appealing setup.
Key Point 1: Planning and Preparation
Before initiating any installation, thorough planning and preparation are essential. This phase involves assessing the wall structure, selecting the appropriate mount for both the TV and cable box, and gathering the necessary tools and materials.
Wall Structure Assessment: The first crucial step involves identifying the type of wall. Walls typically consist of drywall (also known as plasterboard) over wood studs, concrete, or brick. Drywall alone cannot support the weight of a TV and cable box; therefore, it is imperative to locate the wall studs. A stud finder tool is commonly used to identify the location of these studs. In the absence of a stud finder, tapping along the wall can help identify studs by listening for a solid sound, as opposed to the hollow sound of drywall between studs. For concrete or brick walls, specialized anchors and drilling techniques are required, often necessitating professional assistance.
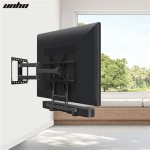
Mount Selection: Choosing the correct TV mount is paramount for safety and stability. TV mounts are categorized into three main types: fixed, tilting, and full-motion. Fixed mounts hold the TV flush against the wall, offering a clean, minimalist look. Tilting mounts allow for slight vertical adjustment, which can be beneficial for reducing glare. Full-motion mounts provide the greatest flexibility, allowing the TV to be extended, swiveled, and tilted. The type of mount selected should be based on viewing preferences, room layout, and the TV's weight and size. Ensure the mount's weight capacity exceeds the TV's weight. Additionally, verify that the mount is VESA (Video Electronics Standards Association) compliant, meaning it adheres to a standardized hole pattern on the back of the TV for secure attachment.
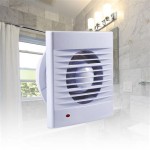
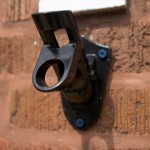
For the cable box, several mounting options exist, including shelves, brackets, and dedicated cable box mounts designed to attach to the wall or to the back of the TV. When selecting a cable box mount, consider the box's dimensions, weight, and ventilation requirements. Proper ventilation is crucial to prevent overheating, which can affect performance and shorten the lifespan of the cable box.
Tools and Materials: Having the right tools and materials readily available will streamline the installation process. Essential tools include a stud finder, level, drill, screwdriver (both Phillips and flathead), measuring tape, pencil, and safety glasses. Additional materials needed include appropriate screws and anchors (depending on the wall type), cable ties, wire strippers, and an HDMI cable if a longer one is required to reach the cable box from the TV.
Safety Precautions: Prioritizing safety is critical throughout the entire process. Before beginning any work, turn off the power to the TV and cable box. Always wear safety glasses to protect your eyes from debris. When drilling into walls, be mindful of electrical wiring and plumbing. If unsure of the location of these utilities, consult with a qualified electrician or plumber. Enlist assistance from another person, especially when lifting and mounting the TV, to prevent accidents and injuries.
Key Point 2: Installation Process
The installation process involves several distinct steps, including attaching the mount to the TV, securing the mount to the wall, mounting the cable box, and connecting the necessary cables.
Attaching the Mount to the TV: Carefully place the TV face down on a soft, protected surface to prevent scratches. Align the mounting bracket with the VESA holes on the back of the TV. Use the appropriate screws (typically included with the mount) to securely attach the bracket to the TV. Ensure the screws are tightened properly but avoid overtightening, which could damage the TV's casing.
Securing the Mount to the Wall: Using the stud finder, locate the wall studs and mark their positions with a pencil. Position the wall plate of the mount against the wall, aligning it with the marked stud locations. Use a level to ensure the wall plate is perfectly horizontal. Drill pilot holes into the studs through the mounting holes in the wall plate. Attach the wall plate to the studs using lag bolts or screws (provided with the mount). For concrete or brick walls, use appropriate masonry anchors and drilling techniques. It is crucial to use fasteners that are specifically designed for these materials to ensure a secure and stable installation. Double-check that the wall plate is securely fastened and level before proceeding.
Mounting the Cable Box: Depending on the selected mount type, attach the cable box mount to the wall or the back of the TV. If mounting to the wall, follow a similar procedure as mounting the TV wall plate, ensuring the mount is securely fastened to a stud or using appropriate anchors for the wall type. If mounting to the back of the TV, ensure the mount does not interfere with the TV's ventilation or connections.
Connecting the Cables: Before hanging the TV, connect the necessary cables, including the HDMI cable, power cable, and any other required connections. This will be easier to do before the TV is mounted on the wall. Once the TV is mounted, connect the other ends of the cables to the cable box and any other devices. Ensure all connections are secure.
Hanging the TV: With the mount properly attached to the TV and the wall, carefully lift the TV and align the bracket on the back of the TV with the corresponding mechanism on the wall plate. Secure the TV to the wall plate according to the mount's instructions. This typically involves locking mechanisms or screws. Ensure the TV is securely attached and level before releasing it.
Key Point 3: Cable Management and Aesthetics
Effective cable management is essential for achieving a clean and professional-looking installation. Unsightly cables detract from the overall aesthetic and can also pose a safety hazard. Several techniques can be employed to conceal and organize cables.
Cable Concealment Options: Several options exist for concealing cables, ranging from simple solutions to more elaborate installations. Cable sleeves or wraps are a cost-effective and straightforward way to bundle cables together, reducing clutter and improving organization. Cable channels or raceways are plastic or metal conduits that can be mounted to the wall to hide cables. These channels are available in various sizes and colors to blend in with the wall. In-wall cable management kits allow cables to be run directly through the wall, creating a completely seamless look. This option requires drilling holes in the wall and may necessitate professional installation.
Cable Organization Techniques: In addition to concealment, proper cable organization can significantly improve the overall appearance. Use cable ties or Velcro straps to bundle cables together and prevent them from tangling. Label each cable to easily identify its purpose. Excess cable length can be coiled and secured with cable ties. Consider using a power strip with surge protection to consolidate power connections and protect the equipment from power surges. Position the power strip strategically to minimize visible cables.
Ventilation Considerations: When concealing the cable box, ensure adequate ventilation to prevent overheating. Avoid placing the cable box in enclosed spaces without proper airflow. Consider using a ventilated cable box mount or leaving sufficient space around the box for air circulation. Regularly check the cable box for dust accumulation and clean it as needed to maintain optimal performance.
Aesthetic Enhancements: Beyond cable management, several aesthetic enhancements can further improve the overall look of the wall-mounted TV and cable box. Consider using a paintable cable channel that matches the wall color. Add decorative elements, such as artwork or shelving, to complement the TV and cable box. Adjust the TV's viewing angle to minimize glare and optimize viewing comfort. Ensure the area around the TV is clutter-free to create a clean and inviting space.
By carefully following these guidelines, a homeowner can successfully wall mount their TV and cable box, achieving a professional and aesthetically pleasing result. The investment of time and effort will yield a cleaner, more organized, and visually appealing entertainment space.
Following these instructions diligently will ensure the longevity of your equipment and the safety of your home.

Small Cable Box Wall Mount Hideit For Tv Set Top Boxes Mounts

Unts Single Av Wall Shelf

How To Hide The Cable Box On A Wall Mounted Tv

Tv Wire Boxes They Are Both Safe And Appealing

Wall Mount Tv With Cable Box Google Search

How To Hide The Cable Box When Mounting Tv On Wall Peridon Entertainment

Peerless Large Recessed Cable Management Box With Power Receptacle Iba2ac

How To Add A Media Shelf Tv Mount Youtube

How To Hide Tv Power Cord And Cables No Outlet Wiring Needed Easy Diy Youtube

Mount It Tv Wall Bracket For Cable Box Dvd Player Stereo Components Shelf 1 Mi 8401