Acer Computer Monitor Wall Mount
Acer computer monitors are a popular choice for many users, offering a wide range of features and options to suit different needs. Whether you're a casual user, a creative professional, or a hardcore gamer, there's an Acer monitor that's right for you.
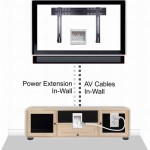
If you're looking to get the most out of your Acer monitor, mounting it on the wall is a great way to save space, improve ergonomics, and create a more immersive viewing experience. Here's a step-by-step guide on how to mount your Acer computer monitor on the wall:
1. Gather Your Materials
Before you start, you'll need to gather the following materials:
- Acer computer monitor
- Wall mount
- Screws
- Drill
- Level
- Stud finder (optional)
2. Choose a Wall Mount
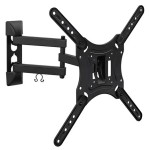
There are many different types of wall mounts available, so it's important to choose one that's compatible with your Acer monitor. The type of mount you choose will depend on the size and weight of your monitor, as well as the viewing angle you want to achieve.
Once you've chosen a wall mount, make sure to read the instructions carefully before you start installing it.
3. Mount the Wall Bracket
The first step is to mount the wall bracket to the wall. The location of the bracket will depend on the type of mount you've chosen and the viewing angle you want to achieve.
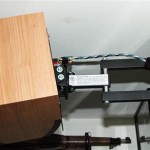
Once you've chosen the location for the bracket, use the drill to create pilot holes for the screws. Then, insert the screws into the pilot holes and tighten them until the bracket is securely mounted to the wall.
4. Attach the Monitor to the Wall Mount
Once the wall bracket is mounted, it's time to attach the monitor to the mount. The process for doing this will vary depending on the type of mount you've chosen, but in general, you'll need to align the monitor with the mount and then tighten the screws until the monitor is securely attached.
5. Adjust the Monitor
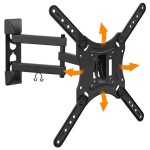
Once the monitor is attached to the wall mount, you can adjust the position of the monitor to achieve the desired viewing angle. Most mounts allow you to tilt, swivel, and rotate the monitor to find the perfect position.
6. Enjoy Your New Wall-Mounted Monitor
Once you've adjusted the monitor to your liking, you can sit back and enjoy your new wall-mounted setup. Mounting your Acer computer monitor on the wall is a great way to save space, improve ergonomics, and create a more immersive viewing experience.
Tips
Here are a few tips for mounting your Acer computer monitor on the wall:
- Use a stud finder to locate the studs in the wall before you drill any holes. This will help to ensure that the wall mount is securely attached.
- Make sure to use the correct screws for the type of wall mount you've chosen.
- Tighten the screws until they are snug, but do not overtighten them.
- If you're not sure how to mount your Acer monitor on the wall, consult a qualified professional.

Vesa Mounting Acer S Community

Mount Ar27hu Vesa Adapter For Compatible Acer Monitors Assembly By Vivo

Vesa Mounting Aopen S Acer Community

Mount Ar02 Vesa Adapter For Compatible Acer Monitors By Vivo

Dual Monitor Wall Mount Suitable For All Acer At Best In Bengaluru

Acer Al2216wbd Lcd Monitor With Wall Mount Tested Works Read Description 99802554439

Acer Nitro 54 61 Cm 21 5 Inch Full Hd Led Backlit Va Panel With Display Widget Visioncare Tilt Able Stand 2x2w Inbuilt Speaker Vesa

Vivo Quick Attach Vesa Adapter Bracket Designed For Acer Viewsonic Monitors

Led Tv Monitor Wall Mount For Asus Acer Dell Hp Nec Lg 19 20 21 22 23 24 26 27

Wall Mount Acer 22cv1q 21 5 Inch Full Hd Led Monitor At 13999 In New Delhi