How To Mount an LG TV on a Wall: A Comprehensive Guide
Mounting an LG TV on a wall can significantly enhance viewing experience and optimize space utilization. The process, while seemingly complex, can be executed successfully with careful planning, the right tools, and adherence to safety precautions. This article provides a detailed, step-by-step guide on how to safely and effectively mount an LG TV on a wall.
Before commencing the installation, it is crucial to understand the various factors that influence the mounting process. These include the TV’s size and weight, wall type, desired viewing height, and the availability of necessary tools and hardware. Neglecting these preliminary considerations can lead to complications during installation and potentially compromise the structural integrity of the wall or the TV itself.
Key Point 1: Preparation and Assessment
The initial stage involves gathering essential information about the LG TV and the intended wall for mounting. Accurate assessment is paramount for a successful and safe installation. This encompasses identifying the TV's specifications, determining the wall type, and locating wall studs.
Firstly, consult the LG TV’s user manual or the manufacturer’s website to identify the Video Electronics Standards Association (VESA) mounting pattern. The VESA pattern refers to the standardized hole configuration on the back of the TV used for attaching the mounting bracket. This pattern is typically expressed in millimeters (e.g., 200x200mm, 400x200mm). Knowing the VESA pattern is essential for selecting a compatible wall mount.
Secondly, determine the TV’s weight. This information is also available in the user manual or on the manufacturer's website. The weight is crucial for selecting a wall mount that can safely support the TV. It's generally advisable to choose a mount rated for a weight capacity exceeding the TV’s weight to provide a safety margin.
Thirdly, identify the type of wall you intend to mount the TV on. Common wall types include drywall, plaster, brick, and concrete. Drywall, also known as gypsum board, is the most common type used in residential construction. Mounting a TV directly onto drywall without proper support is generally not recommended, as drywall anchors alone may not be sufficient to support the weight of the TV over time. Brick and concrete walls are sturdier and can typically support heavier TVs, but require specialized drilling techniques and appropriate anchors.
Finally, locate the wall studs. Wall studs are vertical wooden or metal beams that provide structural support for the wall. They are typically spaced 16 or 24 inches apart. Mounting the TV bracket directly onto wall studs is the most secure method, as the studs can bear a significant amount of weight. A stud finder can be used to locate the studs accurately. Alternatively, tapping lightly on the wall can help identify studs – a solid sound usually indicates the presence of a stud, while a hollow sound indicates the absence of a stud. Once a stud is located, use a small nail or screw to confirm its position. Mark the stud locations clearly with a pencil. If mounting between studs is unavoidable, heavy-duty drywall anchors designed to withstand the TV's weight should be used. Consult with a professional installer if you are unsure about the structural integrity of the wall.
Key Point 2: Selecting the Appropriate Wall Mount and Tools
Choosing the right wall mount and possessing the necessary tools are critical for a successful and safe installation. Selecting an inappropriate wall mount or lacking essential tools can lead to instability, damage to the TV or wall, or even personal injury.
There are several types of wall mounts available, each designed for specific purposes and offering varying degrees of adjustability. The most common types include:
- Fixed Mounts: These mounts are the simplest and most affordable option. They hold the TV flush against the wall, offering minimal adjustability. They are suitable for situations where the viewing angle is fixed and the TV is viewed directly from the front.
- Tilting Mounts: These mounts allow the TV to be tilted vertically, which can help reduce glare and improve viewing angles, especially when the TV is mounted high on the wall.
- Full-Motion Mounts (Articulating Mounts): These mounts offer the greatest flexibility, allowing the TV to be extended, swiveled, and tilted in multiple directions. They are ideal for situations where the TV needs to be viewed from different angles or in different areas of the room.
Considering viewing preferences, room layout, and the TV's size is crucial when choosing a wall mount. Ensure the chosen mount is compatible with the TV’s VESA pattern and has a weight capacity exceeding the TV’s weight. Purchasing a high-quality wall mount from a reputable manufacturer is recommended to ensure durability and reliability.
The following tools are typically required for mounting an LG TV on a wall:
- Stud Finder: To locate wall studs accurately.
- Drill with Various Drill Bits: For drilling pilot holes into wall studs or creating holes for anchors in drywall, brick, or concrete. Use drill bits appropriate for the wall type.
- Screwdriver Set: To tighten screws and bolts.
- Level: To ensure the TV is mounted straight and level. A laser level can be particularly useful for this purpose.
- Tape Measure: To accurately measure distances and ensure correct placement of the mounting bracket.
- Pencil: To mark stud locations and drill points.
- Socket Wrench Set: For tightening larger bolts.
- Wire Strippers/Crimpers: To manage cables and connections.
- Safety Glasses: To protect eyes from debris during drilling.
- Gloves: To protect hands and improve grip.
Gather all necessary tools and ensure they are in good working condition before commencing the installation process. Using the wrong tools or attempting to improvise can lead to damage or injury.
Key Point 3: Mounting the TV and Managing Cables
This stage encompasses attaching the mounting bracket to the TV, securing the wall plate to the wall, and finally, mounting the TV onto the wall plate. Effective cable management is also crucial for a clean and organized setup.
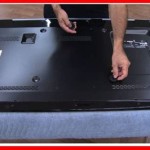
Firstly, attach the mounting brackets to the back of the LG TV, using the screws provided with the wall mount. Align the brackets with the VESA mounting holes, ensuring they are properly aligned and securely tightened. Avoid overtightening the screws, as this can damage the TV’s housing. Consult the wall mount’s instructions for specific guidance on bracket installation.
Secondly, position the wall plate at the desired location on the wall, taking into account the viewing height and the location of wall studs. The optimal viewing height is generally considered to be with the center of the TV at eye level when seated. Use a level to ensure the wall plate is perfectly horizontal. Mark the locations for drilling pilot holes onto the studs. For drywall installations, use the appropriate drywall anchors according to the wall mount instructions. For brick or concrete walls, use a masonry drill bit to create pilot holes and install the appropriate anchors.
Secure the wall plate to the wall using the screws or bolts provided with the wall mount. Tighten the screws securely, ensuring the wall plate is firmly attached to the wall studs or anchors. Double-check the stability of the wall plate before proceeding to the next step. For heavy TVs, it may be beneficial to have a second person assist with lifting and positioning the TV.
Thirdly, carefully lift the TV and align the mounting brackets with the wall plate. Depending on the type of wall mount, the TV may either slide onto the wall plate or require additional screws to secure it in place. Follow the wall mount’s instructions carefully to ensure the TV is properly attached to the wall plate. Once the TV is mounted, double-check its stability and ensure it is securely attached to the wall.
Finally, manage the cables. Unsightly cables can detract from the overall appearance of the wall-mounted TV. Employ cable management solutions to conceal and organize the cables. These solutions might include:
- Cable Sleeves: Flexible tubes that can be used to bundle multiple cables together.
- Cable Channels: Adhesive-backed channels that can be used to run cables along the wall.
- Wall Plates: Plates with openings that allow cables to be run through the wall, concealing them completely.
- Zip Ties and Velcro Straps: To bundle and secure cables.
Connect all necessary cables to the TV, such as HDMI cables, power cables, and audio cables. Route the cables neatly and secure them using cable management solutions. Consider running the cables through the wall to conceal them completely, but this may require professional installation. Ensure all cables are properly connected and securely fastened to prevent them from coming loose. Test the TV to ensure all connections are working properly. A power strip can be mounted behind the TV to hide the plugs, improving the overall look.

Lg Oled C2 Wall Mount Install How To On A Fixed Flat Bracket

Lg Oled C3 Wall Mount Install How To On A Fixed Flat Bracket

How To Wall Mount An Lg Tv

Wall Mounting An Lg Oled Tv Page 1 Home Cinema Hi Fi Pistonheads Uk

Lg G4 Oled Wall Mount Installation The Easy Way Youtube

Lg Oled Wall Mount For Your Tv Vogel S

Lg Oled 65 G2 Wall Mount Install How To On A Bracket

Unveiling The Secret Of Flush Fit On Your Wall

Lg Tv Wall Mounts One For All

Lg Tv Wall Mount 55 Inch Oled Swivel Tilt