How to Mount Speakers on a Wall: A Comprehensive Guide
Mounting speakers on a wall can significantly enhance a home theater or listening room experience. It frees up floor space and allows for optimal sound positioning. This comprehensive guide provides a step-by-step approach to mounting speakers securely and effectively.
1. Choosing the Right Mounting Hardware
Speaker mounts come in various types and sizes. Selecting the correct mount is crucial for safety and optimal sound quality. Consider the speaker's weight, size, and desired positioning when choosing a mount. Key factors include:
*Weight Capacity: Ensure the mount can support the speaker's weight. Exceeding the weight limit can lead to instability and potential damage.
*Speaker Compatibility: Verify the mount's compatibility with the speaker's mounting holes and overall design.
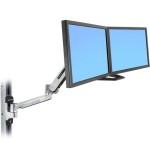
*Adjustability: Consider mounts that offer tilt and swivel adjustments for precise sound direction.
*Material: High-quality steel or aluminum mounts offer durability and stability.
*Type of Mount: Fixed mounts offer a rigid hold, while articulating mounts allow for greater flexibility in positioning.
2. Gathering Necessary Tools and Materials
Proper preparation streamlines the mounting process. Before beginning, gather the following tools and materials:
*Drill with appropriate drill bits: Choose drill bits based on the wall type and mount requirements.
*Screwdriver: Select the correct screwdriver type and size for the mounting screws.
*Level: Ensure precise speaker placement for balanced sound.
*Stud finder: Locate wall studs for secure mounting.
*Measuring tape: Accurate measurements are crucial for proper speaker placement.
*Wall anchors (if needed): For walls without studs, appropriate wall anchors provide secure mounting points. Ensure the anchors are rated for the weight of the speakers.
*Pencil: Mark drilling locations accurately.
*Safety glasses and ear protection: Protect yourself during the drilling process.
3. Locating Wall Studs
Mounting speakers to wall studs provides the most secure installation. Use a stud finder to locate studs behind the wall. Mark the stud locations with a pencil.
*Understanding Stud Spacing: Studs are typically spaced 16 inches apart. Be sure to measure and double-check spacing.
*Alternative Mounting Options: If mounting directly to studs is not possible, use appropriate wall anchors rated for the speaker's weight.
4. Marking Speaker Placement
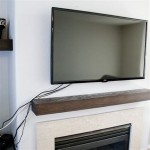
Precise speaker placement is vital for optimal sound quality. Use a measuring tape and level to mark the desired speaker locations on the wall, considering the listening position and room acoustics. Factor in distance from the television or other components if applicable.
*Height Considerations: Consider the listener's ear level when seated. Tweeters should ideally be at ear level.
*Spacing: Adequate spacing between speakers is essential for stereo imaging. Consult speaker manufacturer guidelines for optimal placement.
5. Drilling Pilot Holes
Before attaching the mounts, drill pilot holes at the marked locations using a drill bit slightly smaller than the mounting screws. This prevents wall damage and ensures a secure fit.
*Drilling into Studs: Use a drill bit appropriate for wood studs.
*Drilling into Drywall: Use a drill bit appropriate for drywall, and ensure the anchor selected is appropriate for the wall type.
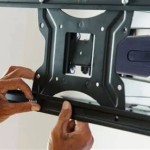
6. Installing Wall Mounts
Securely attach the wall mounts to the wall using the appropriate screws. Ensure the mounts are flush against the wall and properly aligned.
*Using Wall Anchors: If using wall anchors, ensure they are installed correctly according to the manufacturer's instructions before attaching the mounts.
7. Attaching Speakers to Mounts
Carefully attach the speakers to the installed wall mounts, aligning the mounting holes and securing them with the appropriate screws. Avoid overtightening, which could damage the speaker or the mount.
*Cable Management: Conceal speaker wires for a clean and professional look. Use cable clips or raceways to manage wires effectively.
8. Testing Speaker Placement and Sound
After mounting, connect the speakers to the audio system and test the sound. Fine-tune the speaker positioning using the mount's adjustments (if available) to achieve optimal sound quality and coverage.
*Listening Tests: Play various audio sources to test different frequencies and soundstage.
*Adjustments: Make any necessary adjustments to speaker direction or positioning to achieve the desired listening experience.

How To Mount Speakers On Wall Easy Diy Speaker Hanging

How To Mount Speakers On The Wall Mountyourbox

How To Mount Speakers On The Wall Mountyourbox

How To Mount Speakers On Wall Easy Diy Speaker Hanging

Diy Speaker Wall Mounting Tips

When To Wall Mount Speakers The Teufel Audio Blog

How To Mount A Bookshelf Or Satellite Speaker On Your Wall Ceiling Using Brackets Youtube

The 10 Best Speaker Wall Mounts For Home Audio Installation

How To Mount Speakers On The Wall Mountyourbox

In Wall And Ceiling Speaker Placement Installation