HP All-in-One PC Wall Mount
Wall-mounting an HP All-in-One (AIO) PC can free up valuable desk space and create a cleaner, more modern aesthetic. This article explores the key considerations and steps involved in securely and effectively mounting an HP AIO PC to a wall.
Key Considerations Before Mounting
Several factors should be considered before attempting to wall-mount an HP AIO PC. Careful planning ensures a successful and safe installation.
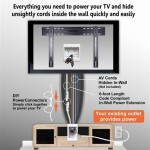
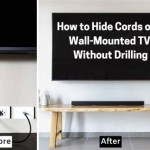
* Compatibility: Confirm the specific HP AIO model's compatibility with VESA mounting standards. Not all AIO PCs are designed for wall mounting. Check the product specifications or user manual for VESA compatibility information. * Wall Type: The wall's construction material dictates the appropriate mounting hardware. Drywall requires different anchors and screws than concrete or brick. Using incorrect hardware could lead to instability and damage. * Weight Capacity: The wall mount must have a weight capacity exceeding the AIO PC's weight. Check both the PC's weight and the mount's specifications to ensure a secure fit. * Cable Management: Plan the routing of power and peripheral cables before mounting. Concealing cables contributes to a cleaner appearance and prevents accidental disconnections. * Ergonomics: Consider the viewing angle and height of the mounted PC. Incorrect placement can lead to neck and eye strain. Positioning the screen at eye level and an arm's length away is generally recommended.
Choosing the Right Wall Mount
Selecting the appropriate wall mount is crucial for stability and functionality. Several types of mounts are available, each offering different features and benefits.
* Fixed Mounts: These mounts offer a stable, low-profile solution for permanent installations. They are ideal for situations where the screen's position doesn't need to be adjusted. * Tilting Mounts: Tilting mounts allow for vertical angle adjustments, providing flexibility for optimizing viewing angles in different lighting conditions or seating arrangements. * Articulating Mounts: These mounts offer the most flexibility, allowing for tilting, swiveling, and extending movements. They are ideal for situations where the screen needs to be repositioned frequently. * VESA Compatibility: Ensure the chosen mount is compatible with the VESA mounting pattern on the back of the HP AIO PC. The VESA standard defines the distance between the mounting holes.
Gathering the Necessary Tools and Materials
Having the correct tools and materials on hand simplifies the installation process.
* Wall Mount Kit: Select a high-quality wall mount kit specifically designed for AIO PCs and compatible with the HP model's VESA mounting pattern. * Screwdriver: Ensure the screwdriver matches the screws included with the wall mount kit. * Drill: A drill with the appropriate drill bit size for the chosen wall anchors is necessary for drilling pilot holes. * Level: A level ensures the PC is mounted straight and avoids uneven weight distribution. * Stud Finder: A stud finder helps locate wall studs for added stability, especially for heavier AIO models. * Wall Anchors (if necessary): Appropriate wall anchors are crucial for drywall installations to provide a secure hold. * Pencil: A pencil is useful for marking drill hole locations.
Step-by-Step Mounting Process
Following a structured process ensures a safe and effective installation.
* Prepare the AIO PC: Disconnect all cables and peripherals from the PC. * Attach the VESA Mount Bracket: Align the VESA mount bracket with the mounting holes on the back of the AIO and secure it with the appropriate screws. * Locate and Mark Wall Studs: Use a stud finder to locate and mark the position of wall studs. * Drill Pilot Holes: Drill pilot holes at the marked locations, using the appropriate drill bit size for the wall anchors. * Install Wall Anchors (if necessary): If not mounting directly to studs, insert wall anchors into the pilot holes. * Attach the Wall Mount Plate: Secure the wall mount plate to the wall using the appropriate screws and anchors. Use a level to ensure the plate is straight. * Mount the AIO PC: Carefully hang the AIO PC with the attached VESA bracket onto the wall mount plate. * Connect Cables and Peripherals: Reconnect all cables and peripherals to the mounted PC. * Test the Installation: Ensure the PC is securely mounted and all connections are functioning correctly.
Post-Installation Tips
Following these tips can optimize the mounted PC's functionality and longevity.
* Cable Management: Use cable ties or clips to organize and conceal cables. * Regular Inspection: Periodically check the mount's stability and tighten any loose screws. * Cleaning: Regularly clean the AIO PC and the surrounding area to prevent dust buildup.
Safety Precautions
Safety should be a paramount concern throughout the installation process.
* Power Off: Always disconnect the power cable before working on any electrical equipment. * Proper Tools: Use appropriate tools and safety equipment, such as safety glasses. * Professional Assistance: If unsure about any aspect of the installation, seek professional assistance.

Hp Aio 24 Df0040 Stand Removal Wall Mount Support Community 8293017

Gladiator Joe Hp All In One Vesa Adapter Gj0a0111 R2

Hp Eliteone G9 Vesa Plate Sri Lanka

Hp Wall Mount For Power Supply All In One Computer Monitor Black 56p78aa Stands Cdw Com

Hp All In One 22 24 Pc Monitor Vesa Adapter India Etsy
--75x75mm___152_0_316973.jpg?strip=all "Vesa Adapter Compatible With Hp All In One Pc 24 Cr 27 Series 75x75mm")
Vesa Adapter Compatible With Hp All In One Pc 24 Cr 27 Series 75x75mm

How To Mount Hp Envy 23 All In One Pc On Vesa Arm
--75x75mm___164_2_192780.jpg?strip=all "Vesa Adapter Compatible With Hp All In One Pc Proone 400 G6 75x75mm")
Vesa Adapter Compatible With Hp All In One Pc Proone 400 G6 75x75mm

Hp Proone G9 Vesa Plate With Power Supply Holder Saudi Arabia

Hp B300 Mounting Bracket For Workstation Mini Pc Thin Client 2dw53at Monitor Mount Accessories Cdw Ca