Mount Your TV on the Wall: A Comprehensive Guide
Mounting a television on the wall has become a popular method for optimizing space, improving viewing angles, and creating a cleaner, more modern aesthetic in homes and offices. However, the process requires careful planning, proper tools, and a thorough understanding of safety precautions to ensure a successful and secure installation. This guide provides a comprehensive overview of the steps involved in mounting a television on the wall, from assessment and preparation to the actual mounting process and cable management.
Before embarking on this project, it is crucial to understand that improper installation can lead to damage to the television, the wall, and potentially cause injury. If there is any uncertainty about abilities or comfort level, it is always recommended to consult a professional installer. Safety should always be the top priority.
Key Point 1: Assessing Compatibility and Planning
The initial stage involves a thorough assessment of several factors to determine the feasibility and suitability of wall mounting. This includes evaluating the television's specifications, the wall structure, and the desired viewing location.
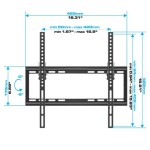
First, consult the television's user manual or manufacturer's website to determine its weight, dimensions, and VESA (Video Electronics Standards Association) mounting pattern. The VESA pattern refers to the standardized hole configuration on the back of the television used for attaching the mounting bracket. These dimensions are usually expressed in millimeters (e.g., 200x200mm, 400x400mm). Ensure that the chosen mounting bracket is compatible with the television's VESA pattern and weight capacity. Exceeding the bracket's weight limit can result in a catastrophic failure.
Next, assess the wall structure to determine its composition. Common wall types include drywall, plaster, brick, and concrete. Drywall, also known as gypsum board, is the most common type in residential construction and requires specific anchoring techniques to provide sufficient support for the television. Brick and concrete walls offer inherently stronger support but may require specialized drilling tools and anchoring hardware. Plaster walls can be challenging due to their fragility and potential for crumbling; extreme caution is advised.
Identifying wall studs is crucial for securely mounting the television, especially on drywall. Wall studs are vertical framing members that provide structural support. A stud finder, available at most hardware stores, is an essential tool for locating these studs. Electronic stud finders typically use sensors to detect changes in density behind the wall surface, indicating the presence of a stud. Magnetic stud finders can also be used, which detect the nails or screws used to fasten the drywall to the stud. Once located, accurately mark the stud locations with a pencil.
Finally, consider the desired viewing location and viewing angle. Determining the optimal height for the television is essential for comfortable viewing. A general guideline is to position the center of the screen at eye level when seated. Take into account the typical viewing distance and the height of the furniture in the room. Also, evaluate the potential for glare from windows or lighting fixtures and consider adjusting the television's position to minimize reflections. Consider purchasing a tilting mount if there is a need to adjust the viewing angle frequently.
Key Point 2: Gathering Tools and Materials
Having the right tools and materials is essential for a smooth and efficient installation process. This section outlines the necessary items and their specific purposes.
A stud finder is crucial for locating wall studs accurately. As mentioned previously, electronic or magnetic stud finders can be used. A level, preferably a bubble level or a laser level, is needed to ensure that the mounting bracket is installed horizontally. A drill with various drill bits is necessary for creating pilot holes for screws and potentially drilling into brick or concrete if applicable.
A screwdriver, preferably a Phillips head and a flathead, is required for tightening screws. A socket wrench set may be needed depending on the type of mounting hardware used. A measuring tape is essential for accurate measurements, including stud spacing and television dimensions. A pencil is used for marking stud locations and drilling points.
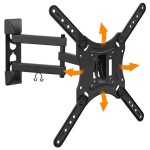
Appropriate mounting hardware is critical for a secure installation. This includes the mounting bracket itself, screws, anchors, and potentially washers. Ensure that the screws and anchors are specifically designed for the wall type. For drywall, use toggle bolts or heavy-duty drywall anchors. For brick or concrete, use masonry screws or concrete anchors. The mounting bracket should be VESA compatible and have the appropriate weight capacity for the television.
Cable management accessories, such as cable ties, cable clips, and a cable concealer, are helpful for organizing and concealing the television cables. This will create a cleaner and more aesthetically pleasing appearance. Consider purchasing a surge protector to protect the television from power surges. Finally, safety glasses and work gloves are recommended to protect the eyes and hands during the installation process.
Key Point 3: The Mounting Process and Cable Management
With the necessary preparations completed and the tools and materials gathered, the mounting process can commence. This section outlines the steps involved in attaching the mounting bracket to the wall and the television, and managing the cables for a clean and organized setup.
Begin by attaching the mounting arms to the back of the television using the screws provided with the mounting bracket. Ensure that the mounting arms are securely fastened to the VESA mounting holes on the television. Consult the mounting bracket's instructions for specific guidance on attaching the arms. Carefully lift the television and position it on a stable surface, protecting the screen from scratches or damage.
Next, attach the mounting plate to the wall. Align the mounting plate with the marked stud locations. Use a level to ensure that the plate is perfectly horizontal. Drill pilot holes through the mounting plate and into the wall studs. If using drywall anchors, follow the manufacturer's instructions for installing the anchors. Secure the mounting plate to the wall using the appropriate screws. Ensure that the screws are tightened firmly, but avoid over-tightening, which could strip the screw heads or damage the wall.
Once the mounting plate is securely attached to the wall, carefully lift the television with the mounting arms attached and align it with the mounting plate. Engage the locking mechanism, which typically involves sliding the mounting arms onto the mounting plate until they click into place. Double-check that the television is securely attached to the mounting plate before releasing it.
Finally, address cable management. Connect all necessary cables to the television, including power, HDMI, and any other required cables. Use cable ties or cable clips to bundle the cables together and route them neatly along the wall. A cable concealer can be used to hide the cables completely, creating a cleaner and more professional appearance. Ensure that the cables are not obstructing the television's ventilation or causing any strain on the connections.
After completing the installation, test the television to ensure that it is functioning properly. Verify that the picture and sound are working correctly. Make any necessary adjustments to the viewing angle or television settings. Clean up any debris or tools left over from the installation process. By following these steps carefully and prioritizing safety, a television can be successfully mounted on the wall, enhancing the viewing experience and optimizing the use of space.
Remember to always consult the manufacturer's instructions for both the television and the mounting bracket. If any doubts arise, seek assistance from a professional installer to ensure a safe and secure installation.
Regularly inspect the mounting hardware to ensure that it remains secure and that there are no signs of wear or damage. Periodic maintenance will help prevent potential problems and ensure the long-term stability of the wall-mounted television.

How To Mount A Flat Screen Tv On Wall The Home

How To Mount A Flat Screen Tv On Wall The Home

Tv Wall Mounting Service Guide To Diffe Methods Install My Antenna

How To Mount A Flat Screen Tv On Wall The Home

How To Mount Tv On Wall By Yourself Fantastic Handyman Blog

Can Any Tv Be Wall Mounted Everything You Need To Know About Vesa Patterns

A Clever And Easy Way To Hang Your Tv On Wall By Yourself

Tv Mounting Height Calculator

Why Get A Professional To Do Your Tv Wall Mount Install My Antenna

How To Mount A Flat Screen Tv On Wall The Home