Mounting a curved TV on the wall
Mounting a curved TV on a wall may look intimidating, but it’s a relatively easy process that can be completed in a few hours. By following these simple steps, you can mount your TV securely and enjoy its picture-perfect quality.
1. Gather your tools and materials
Before you begin, you’ll need to gather the following tools and materials:
- Curved TV mount
- Screwdriver
- Drill
- Level
- Stud finder
- Measuring tape
- Pencil
- Drill bits
- Washers
- Nuts
- Bolts
2. Determine the best location for your TV
Once you have your tools and materials, you need to determine the best location for your TV. Consider the following factors:
- Viewing distance: The ideal viewing distance for a curved TV is about 1.5 to 2.5 times the diagonal measurement of the screen.
- Viewing angle: Curved TVs offer a wider viewing angle than flat TVs, so you can enjoy a great picture even if you’re not sitting directly in front of the TV.
- Furniture: Make sure there is enough space around your TV for furniture and other objects.
- Lighting: Avoid mounting your TV in a location where it will be exposed to direct sunlight or glare.
3. Mark the mounting holes
Once you have determined the best location for your TV, you need to mark the mounting holes. Use a level to make sure that the TV is level, and then use a pencil to mark the location of the mounting holes.
4. Drill pilot holes
Once you have marked the mounting holes, you need to drill pilot holes. Use a drill bit that is slightly smaller than the diameter of the screws that you will be using to mount the TV.
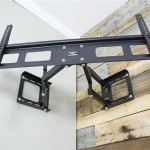
5. Install the mounting brackets
Once you have drilled the pilot holes, you need to install the mounting brackets. The specific instructions for installing the mounting brackets will vary depending on the type of mount that you are using.
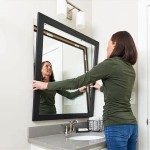
6. Mount the TV
Once the mounting brackets are installed, you can mount the TV. Carefully lift the TV onto the mounting brackets and then secure it with the screws.
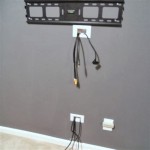
7. Connect the cables
Once the TV is mounted, you can connect the cables. Make sure to use high-quality cables to ensure the best possible picture and sound quality.
8. Enjoy your new curved TV
Once you have connected the cables, you can enjoy your new curved TV. Sit back, relax, and enjoy the stunning picture quality.

How To Mount A Curved Lcd Tv Securely The Wall

Curved Tv On Wall

Can You Mount A Curved Screen Hdtv Monitor Onto The Wall

How To Wall Mount A Curved Tv With Sanus Swivel Vlc1 B1

How To Wall Mount A Curved Tv 6 Steps Instructables

How To Mount A Curved Lcd Tv Securely The Wall

Selecting The Best Curved Tv Wall Mount Bracket Nerd Techy

Can You Mount A Curved Tv Quick Steps To Correctly Tvs Wall Installation

Installation Guide Of Loctek Curved Tv Mount R2 Youtube

Projects Archive Page 4 Of 7 Easy Tv