Mounting a Samsung TV on the Wall
Mounting a television on the wall provides a sleek, modern aesthetic and saves valuable floor space. While the process may appear daunting, with the right tools and careful preparation, mounting a Samsung TV can be a manageable DIY project. This article provides a comprehensive guide to ensure a secure and successful installation.
Choosing the Right Mount
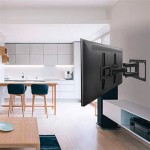
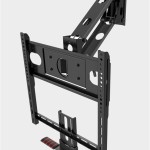
Selecting the appropriate wall mount is crucial for a successful installation. Several factors influence this decision, including the TV's size and weight, desired viewing angle, and wall type. Fixed mounts offer a flush, space-saving profile ideal for direct viewing. Tilting mounts allow for vertical angle adjustments, compensating for higher placement. Full-motion mounts provide maximum flexibility, enabling tilting, swiveling, and extending the TV from the wall for optimal viewing from various angles. Carefully consult the TV's specifications and the mount's weight capacity to ensure compatibility.
Gathering Necessary Tools and Materials
Before beginning the installation, gather all necessary tools and materials. This typically includes a stud finder, drill with appropriate drill bits (including a masonry bit for brick or concrete walls), screwdriver, level, measuring tape, wall mount kit (which usually includes mounting screws), and the TV's user manual. Having everything readily available streamlines the process and avoids interruptions.
Locating and Marking Wall Studs
Locating the wall studs is critical for secure mounting. Use a stud finder to identify the center of each stud in the desired mounting location. Mark these points clearly with a pencil. Wall studs provide the structural support necessary to hold the TV's weight safely. If mounting on drywall without hitting studs, specialized drywall anchors rated for the TV's weight are required. Consult the anchor packaging for weight limits and proper installation procedures.
Installing the Wall Mount Bracket
With the stud locations marked, position the wall mount bracket against the wall, aligning the mounting holes with the stud marks. Use a level to ensure the bracket is perfectly horizontal. Using the appropriate screws (typically provided with the wall mount kit), securely attach the bracket to the wall studs. Using the correct screw length is essential to ensure the screws penetrate the studs deep enough for a secure hold. Overtightening can damage the wall or the bracket, while under-tightening compromises the stability of the mount.
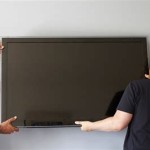
Attaching the Mounting Plate to the TV
Consult the TV's user manual to identify the correct mounting hole pattern and locate the corresponding mounting holes on the back of the TV. Align the mounting plate (included with the wall mount kit) with the TV's mounting holes. Using the appropriate screws (also usually provided with the kit), securely attach the mounting plate to the TV. Ensure the screws are tightened appropriately, but avoid overtightening, which could damage the TV's internal components.
Mounting the TV onto the Wall Bracket
With the wall bracket installed and the mounting plate attached to the TV, carefully lift the TV and align the mounting plate with the wall bracket. Depending on the mount type, this might involve hooking the plate onto the bracket or inserting it into a designated slot. Once the TV is securely engaged with the bracket, double-check its stability and ensure it is level. Some mounts include locking mechanisms for added security; engage these if present, as instructed by the manual.
Connecting Cables and Managing Wires
After securely mounting the TV, connect the necessary cables (power, HDMI, etc.). For a clean and organized appearance, consider using cable management solutions such as cable ties, clips, or raceways to conceal and organize the wires behind the TV. This not only improves the aesthetic appeal but also prevents accidental disconnections and tripping hazards.
Testing the Installation
Once all cables are connected and managed, power on the TV to test the installation. Check the picture and sound quality and ensure the TV remains securely mounted. Gently try adjusting the TV's angle (if applicable based on the mount type) to confirm its stability. If any issues arise, double-check all connections, screws, and the mount's engagement with the wall bracket and mounting plate.

Things To Consider Before Wall Mounting Your Samsung Tv Australia

How To Mount A Samsung Tv On The Wall Youtube

How To Wall Mount Your Samsung Tv Ie

Things To Consider Before Mounting Your Samsung Tv On A Wall

How To Wall Mount A Samsung 50 Led Tv Using Bracket Youtube

Full Motion Slim Wall Mount Wmn B Tv Accessories Review And Specs Samsung Country Name

Things To Consider Before Mounting Your Samsung Tv On A Wall

Slim Fit Wall Mount 2024 Flush Tv With Samsung Us

Samsung 55tu7200 Wall Mount Led Tv At 58800 Piece In Nagercoil Id 23336387212

Wall Mounting 70 Inch Samsung Tu7000 Tv With Cheetah Mount Kit