Mounting Shelves on Concrete Walls: A Comprehensive Guide
Mounting shelves on concrete walls presents different challenges compared to drywall or wood. Concrete's inherent hardness and density require specific tools and techniques for secure and lasting installation. This article provides a detailed guide to successfully mounting shelves on concrete walls, covering everything from necessary tools and materials to step-by-step instructions and considerations for different shelf types and weight capacities.
Before commencing any work, assessing the wall’s composition is crucial. While “concrete wall” is a general term, several variations exist, each requiring potentially different approaches. Solid concrete walls, poured concrete, and concrete blocks (cinder blocks) all behave differently under the stress of anchors and screws. Identifying the specific type of concrete will inform decisions about anchor selection and drilling techniques. Attempting to drill into a solid concrete wall with a drill inadequate for the task can result in damage to the drill bit and the wall itself. Similarly, using anchors designed for lighter loads on a shelf intended to hold heavy items can lead to failure and potential injury.
Safety is paramount when working with concrete. Dust generated during drilling poses a respiratory hazard, and flying debris can cause eye injuries. Therefore, wearing appropriate personal protective equipment (PPE) is essential. This includes safety glasses or goggles to protect the eyes, a dust mask or respirator to prevent inhaling concrete dust, and work gloves to protect the hands. Additionally, ensure the work area is well-ventilated to minimize dust accumulation. Before drilling, check for the presence of electrical wiring or plumbing within the wall. Using a stud finder with AC wire detection capabilities can help avoid accidentally damaging these concealed utilities. If there is any doubt about the location of utilities, consult a qualified electrician or plumber before proceeding.
Key Point 1: Tools and Materials Required
Successfully mounting shelves on concrete requires a specific set of tools and materials. The right equipment ensures a clean, secure installation and minimizes the risk of damaging the wall or the shelves.
A hammer drill is the most crucial tool. Unlike standard drills, hammer drills combine rotary motion with a hammering action, effectively pulverizing the concrete as the drill bit rotates. This hammering action is essential for creating clean, precisely sized holes in concrete. The size and power of the hammer drill should be appropriate for the diameter and depth of the holes required for the chosen anchors. Cordless hammer drills offer mobility and convenience, but corded models generally provide more consistent power, especially for larger or more demanding projects. Alternatively, a rotary hammer drill, which uses a piston mechanism for even more forceful hammering, is ideal for heavy-duty applications and tougher concrete.
Concrete drill bits, specifically designed for drilling into concrete, are essential. These bits feature hardened carbide tips that can withstand the abrasive nature of concrete. Select the appropriate size drill bit based on the recommendations for the chosen concrete anchors. Using the wrong size drill bit will result in either holes that are too small for the anchors to fit or holes that are too large, compromising their holding power. It is often beneficial to have a set of concrete drill bits in various sizes to accommodate different anchor types and shelf requirements. Furthermore, using new or sharp drill bits ensures efficient drilling and reduces the risk of bit breakage.
Choosing the right concrete anchors is critical for a secure and lasting installation. Several types of concrete anchors are available, each with different load capacities and installation requirements. Wedge anchors are robust anchors suitable for heavy loads. They expand as they are tightened, creating a strong grip within the concrete. Sleeve anchors are another popular choice, offering good holding power and ease of installation. Tapcon screws, also known as concrete screws, are self-tapping screws designed specifically for concrete. They require pre-drilling pilot holes but offer relatively easy installation and good holding power for lighter loads. Plastic or nylon wall plugs are suitable for lighter-duty applications and are typically used with standard wood screws. The choice of anchor depends on the weight the shelves will support and the type of concrete wall. Always refer to the manufacturer's specifications for load capacity and installation instructions.
Additional necessary tools include a level to ensure the shelves are mounted straight, a measuring tape for accurate placement, a pencil for marking drilling locations, a hammer for tapping in anchors, a screwdriver or socket wrench for tightening anchors, and a vacuum cleaner or brush for removing concrete dust. A stud finder with AC wire detection capabilities is helpful for identifying the location of studs behind the concrete and for detecting the presence of electrical wiring. Having these tools readily available will streamline the installation process and minimize potential complications.
Key Point 2: Step-by-Step Installation Process
Following a structured installation process is essential for achieving a secure and aesthetically pleasing result when mounting shelves on concrete walls. Accuracy and attention to detail are critical throughout the process.
The initial step involves planning and layout. Determine the desired location for the shelves and use a measuring tape and level to mark the exact positions for the mounting brackets. Consider the weight the shelves will support and ensure that the mounting locations are adequately spaced to distribute the load evenly. Use a stud finder to check for any hidden utilities, such as electrical wiring or plumbing, behind the wall. If necessary, adjust the shelf placement to avoid these obstructions. Accurate marking of the drilling locations is crucial for ensuring that the shelves are mounted straight and level.
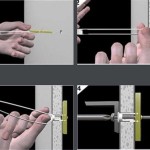
Next, prepare the drill. Insert the appropriate size concrete drill bit into the hammer drill and ensure it is securely fastened. Put on safety glasses and a dust mask to protect your eyes and respiratory system from concrete dust. Position the drill bit at the marked location and begin drilling. Apply firm, even pressure while drilling, allowing the hammer drill to do the work. Avoid forcing the drill bit, as this can cause it to overheat or break. Drill to the depth recommended by the anchor manufacturer. Periodically remove the drill bit from the hole to clear away concrete dust. A small vacuum cleaner can be helpful for removing dust from the hole. Ensure the drilled hole is clean and free of debris before inserting the anchor.
Install the concrete anchors according to the manufacturer's instructions. For wedge anchors, insert the anchor into the hole and tap it in with a hammer until it is flush with the surface of the wall. Then, tighten the nut with a wrench to expand the anchor and secure it in place. For sleeve anchors, insert the anchor into the hole and tighten the nut to draw the sleeve against the concrete. For Tapcon screws, pre-drill a pilot hole and then drive the screw into the concrete using a screwdriver or drill. For plastic or nylon wall plugs, insert the plug into the hole and then drive a wood screw into the plug. Ensure the anchors are securely fastened and can support the weight of the shelves and their contents.
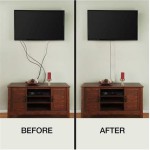
Finally, attach the shelf brackets to the wall using the installed anchors. Align the brackets with the anchors and secure them with screws or bolts. Ensure the brackets are level and properly aligned. Place the shelf on the brackets and secure it with screws or bolts, if necessary. Test the stability of the shelf by gently applying pressure to it. If the shelf feels wobbly or unstable, re-tighten the anchors or consider using larger or more robust anchors. Ensure the shelves are securely mounted and can safely support the intended weight.
Key Point 3: Considerations for Different Shelf Types and Weight
The type of shelf and the anticipated weight it will bear significantly influence the choice of anchors and the overall installation approach. Different shelf materials and designs require different levels of support, and exceeding the load capacity of the anchors can lead to catastrophic failure.
For lightweight shelves made of materials like particleboard or thin wood, plastic or nylon wall plugs or Tapcon screws may be sufficient, especially if the shelves will primarily hold decorative items or lightweight books. However, for heavier shelves made of solid wood, metal, or glass, more robust anchors like wedge anchors or sleeve anchors are recommended. The load capacity of the anchors should always exceed the anticipated weight of the shelf and its contents by a significant margin. Consulting the manufacturer's specifications for both the shelves and the anchors is essential for determining the appropriate support system.
The design of the shelf also plays a role in determining the required support. Shelves with a large span between supports are more prone to sagging or bowing under heavy loads. In such cases, using additional brackets or supports can help distribute the weight more evenly. Floating shelves, which lack visible supports, require particularly strong anchors and careful installation to ensure they can safely support the intended weight. The distribution of weight on the shelf is also important. Placing heavier items closer to the supports and lighter items towards the center can minimize stress on the anchors. Avoid concentrating heavy loads in a single area of the shelf.
When mounting multiple shelves on a single wall, consider the overall weight distribution. Avoid placing multiple heavy shelves in close proximity, as this can overload the wall and potentially compromise its structural integrity. Staggering the placement of the shelves or using a combination of light and heavy shelves can help distribute the weight more evenly. Regularly inspect the shelves and the anchors for any signs of wear or damage. If the anchors appear to be loosening or the shelves are sagging, take immediate action to reinforce the support system. This may involve tightening the anchors, adding additional supports, or replacing the anchors with larger or more robust ones. Proactive maintenance can prevent potential failures and ensure the long-term safety and stability of the shelves.

Title Page

How To Install Shelves On A Concrete Block Or Brick Wall Using Tapcon Anchor Screws Youtube

Title Page

Attach Shelving To Cinder Block Walls

How To Install Shelves On A Concrete Block Or Brick Wall Using Tapcon Anchor Screws

Hanging Shelves From A Concrete Wall R Homeimprovement

How To Hang Floating Shelves

How To Install Shelves On A Concrete Block Wall

How To Hang Shelves Without Studs 3 Drywall Options

How To Attach A Shelf Concrete Wall Doityourself Com