Mounting a Sony Bravia TV on a Wall: A Comprehensive Guide
Mounting a Sony Bravia TV on a wall offers several benefits, including space optimization, improved viewing angles, and enhanced aesthetics. This process, while relatively straightforward, requires careful planning, the right tools, and adherence to safety guidelines. This article provides a comprehensive guide to mounting your Sony Bravia TV securely and effectively.
Before commencing the wall mounting process, it is crucial to verify the TV's compatibility. Check the Sony Bravia TV's user manual or the Sony support website to determine if the model is designed for wall mounting. Specific models may have unique mounting requirements or recommended VESA standards. The VESA standard (Video Electronics Standards Association) refers to the spacing of the threaded mounting holes on the back of the TV.
Ensuring compatibility also involves checking the weight of the TV and comparing it to the weight capacity of the wall mount. Using a mount that is not rated for the TV’s weight poses a significant safety risk. Consider the type of wall construction you have, be it drywall, brick, concrete, or metal studs, as different wall types require different mounting techniques and hardware.
Selecting the Appropriate Wall Mount
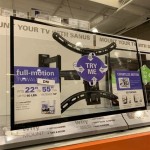
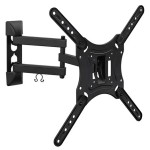
Choosing the right wall mount is paramount for a successful and safe TV installation. Wall mounts are available in three primary types: fixed, tilting, and full-motion (articulating). Each type offers distinct advantages and caters to different viewing preferences.
Fixed Mounts: As the name suggests, fixed wall mounts position the TV flush against the wall. They offer the simplest installation and the most streamlined aesthetic. Fixed mounts are ideal for situations where the viewing angle is already optimized and adjustments are not frequently needed. They are typically the least expensive option.
Tilting Mounts: Tilting mounts allow the TV to be tilted vertically, typically downwards. This feature is particularly useful for reducing glare from windows or lights and for improving the viewing angle when the TV is mounted higher than eye level. Tilting mounts offer a degree of flexibility without the complexity of full-motion mounts.
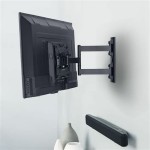
Full-Motion (Articulating) Mounts: Full-motion mounts provide the greatest range of motion, allowing the TV to be tilted vertically and swiveled horizontally. These mounts are ideal for situations where the viewing angle needs to be adjusted frequently, such as in multi-purpose rooms or open-plan living areas. Full-motion mounts are generally more expensive and require more complex installation due to their articulated arms.
When selecting a wall mount, verify that it supports the specific VESA standard for your Sony Bravia TV. The VESA standard is typically expressed in millimeters (e.g., 200x200, 400x400). The product specifications for both the TV and the wall mount will list the VESA compatibility. The wall mount should also be compliant with safety certifications and be manufactured from durable materials. Look for certifications from reputable testing organizations.
Gathering the Necessary Tools and Materials
Having the right tools and materials readily available is essential for a smooth and efficient installation. The following list encompasses the items typically required for mounting a Sony Bravia TV:
- Wall mount (compatible with TV’s VESA standard and weight)
- Drill with appropriate drill bits (for pilot holes and mounting screws)
- Stud finder (for locating wall studs, if applicable)
- Level (to ensure the TV is mounted straight)
- Screwdriver (Phillips head and flathead)
- Pencil (for marking locations)
- Measuring tape
- Safety glasses
- Work gloves
- Cable management solutions (cable ties, cord concealers)
- Appropriate mounting hardware (screws, anchors, washers) suitable for the wall type
The hardware included with the wall mount may not be suitable for all wall types. For instance, mounting into drywall without proper anchors can lead to the TV falling off the wall. Wall anchors rated for the weight of the TV and mount are crucial for drywall installations. For concrete or brick walls, use masonry drill bits and appropriate concrete anchors. Consult a hardware professional if unsure about the correct hardware for your specific wall type.
Before beginning the installation, carefully unpack the wall mount and verify that all the components are present. Read the manufacturer's instructions thoroughly. Familiarize yourself with the steps involved and identify any potential challenges before encountering them during the process.
Step-by-Step Installation Process
The installation process involves several key steps, each requiring precision and attention to detail. Following these steps carefully will ensure a secure and aesthetically pleasing installation.
Step 1: Locate Wall Studs (If Applicable): For drywall walls, it is highly recommended to mount the TV to wall studs. Studs provide the strongest support and minimize the risk of the TV falling. Use a stud finder to locate the studs. Mark the stud locations clearly with a pencil. If studs are not available at the desired mounting location, use appropriate drywall anchors rated for the weight of the TV and mount. Follow the anchor manufacturer's instructions for proper installation.
Step 2: Attach Mounting Brackets to the TV: Using the screws provided with the wall mount, attach the mounting brackets to the back of the Sony Bravia TV. Ensure that the brackets are aligned correctly and securely fastened to the VESA mounting holes. Do not overtighten the screws, as this could damage the TV. Refer to the TV's user manual for specific torque recommendations, if available.
Step 3: Mount the Wall Plate: Position the wall plate at the desired location on the wall. Use a level to ensure that the plate is perfectly horizontal. Mark the locations for the mounting screws. Drill pilot holes into the wall at the marked locations. Secure the wall plate to the wall using the appropriate mounting hardware for your wall type. If mounting to wall studs, use lag bolts that are long enough to penetrate deeply into the studs. If using drywall anchors, follow the anchor manufacturer's instructions for installation. Double-check that the wall plate is securely attached and level before proceeding.
Step 4: Hang the TV on the Wall Plate: With assistance, carefully lift the TV and align the mounting brackets with the wall plate. Secure the TV to the wall plate using the locking mechanism of the wall mount. This usually involves snapping the brackets into place or tightening screws. Ensure that the TV is securely attached to the wall plate before releasing it. Gently tug on the TV to verify that it is firmly mounted.
Step 5: Connect Cables and Manage Cords: Connect all necessary cables to the TV, such as HDMI cables, power cords, and antenna cables, before completely securing the TV to the wall. This is easier to do while the TV is still slightly accessible. Once the cables are connected, use cable ties or cord concealers to organize and hide the cables. This will create a cleaner and more aesthetically pleasing appearance. Consider using a wall-mounted power outlet and cable pass-throughs to further conceal cords within the wall. Do not stuff cables tightly, as this could damage them. Leave some slack to allow for adjustments or movement.
Step 6: Level and Adjust the TV: Use a level to ensure that the TV is perfectly level. If necessary, make minor adjustments to the wall mount to fine-tune the TV's position. For tilting or full-motion mounts, adjust the tilt and swivel angles to optimize the viewing experience. Tighten all screws and locking mechanisms to secure the TV in its final position. Re-check all connections and cable management solutions.
Step 7: Clean Up: Clean up any debris from the installation process, such as drill shavings and packaging materials. Dispose of the packaging materials properly. Verify that all tools are accounted for and stored safely.
Step 8: Post-Installation Check: After completing the installation, conduct a thorough check to ensure that the TV is securely mounted and functioning correctly. Test all input sources and adjust the TV settings to optimize the picture and sound quality. Regularly inspect the wall mount and hardware for any signs of loosening or damage. Tighten any loose screws or replace damaged hardware immediately. If you notice any instability or concerns about the installation, consult a professional installer.

How To Mount The Tv On A Wall Sony Usa

How To Wall Mount Your Tv X80h X90h X91h X95h Series Of 55 65 Inches Sony Sg

Mounting Sony Tv On Vesa Bracket Page 1 Home Cinema Hi Fi Pistonheads Uk

How To Mount The Tv On A Wall Sony Usa

Manuals For Wall Mount Bracket Sony Sg

Sony Bravia 55 Inch Tv Unboxing Wall Mount Installation

How To Wall Mount Your Sony Led Tv Youtube
How To Wall Mount Your Oled Tv A9f Series Sony Sg

Sony Bravia 43 Inch 4k Tv Wallmount Installation Wallmounting Mounting
X850e And X900e Series Wall Mount Installation Information Sony Latin America