Here is an article about mounting a TV on a tile wall:
Mounting a TV on a Tile Wall: A Comprehensive Guide
Mounting a television on a tile wall presents a unique set of challenges compared to drywall or wood surfaces. Tile is inherently brittle and prone to cracking or shattering if not handled correctly. Furthermore, the smooth, hard surface of tile can make it difficult for standard mounting hardware to grip securely. However, with careful planning, the right tools, and the appropriate techniques, mounting a TV on a tile wall can be achieved safely and aesthetically.
This article provides a detailed guide on how to successfully mount a television on a tile wall. It outlines the essential considerations, necessary tools, and step-by-step process for achieving a secure and visually appealing installation. Before proceeding, it is crucial to understand the potential risks involved and take all necessary safety precautions.
Understanding the Tile and Wall Structure
Before beginning the mounting process, it is vital to assess the tile and underlying wall structure. Different types of tile have varying levels of hardness and density. Porcelain tiles are generally harder and more durable than ceramic tiles. Natural stone tiles, such as marble or granite, also require specialized drilling techniques.
The composition of the wall behind the tile is equally important. Most tile walls are constructed with a layer of cement backer board or drywall over studs. Knowing the location of these studs is essential for providing additional support for the TV mount. If the wall is composed of concrete or brick behind the tile, the mounting process will require different hardware and techniques.
Determining the type of tile and wall construction allows for the selection of appropriate drill bits, anchors, and mounting hardware. Attempting to drill into tile without the correct bit can result in cracking or chipping.
Essential Tools and Materials
Successfully mounting a TV on a tile wall requires a specific set of tools and materials. Using the wrong tools can lead to damage to the tile or an insecure installation.
The following is a list of essential tools and materials:
*TV Wall Mount:
Choose a mount that is compatible with the TV's weight and VESA mounting pattern. Consider the desired viewing angle and select a fixed, tilting, or full-motion mount accordingly. *Drill:
A variable-speed drill is essential for controlled drilling. *Diamond-tipped Drill Bits:
Specifically designed for drilling through tile without causing cracks or chips. A set of varying sizes is recommended. *Masonry Drill Bits:
If drilling into concrete or brick behind the tile. *Stud Finder:
To locate the wall studs for added support. *Level:
Ensuring the TV mount is perfectly level is crucial for aesthetic appeal and stability. *Measuring Tape:
For accurate measurements of the TV, wall, and mounting location. *Pencil:
For marking drilling locations. *Safety Glasses:
Protect your eyes from tile dust and debris. *Dust Mask:
To avoid inhaling tile dust. *Painter's Tape:
To protect the tile surface from scratches and prevent the drill bit from slipping. *Anchors:
Select anchors appropriate for the wall material behind the tile (e.g., drywall anchors, concrete anchors). *Screws:
Ensure the screws are the correct length and type for the chosen anchors and the TV mount. *Hammer:
For tapping anchors into place (if required). *Vacuum Cleaner:
To clean up tile dust and debris. *Wet Sponge:
To wipe away tile dust and coolant from the drill bit.Step-by-Step Mounting Process
The following steps provide a comprehensive guide to mounting a TV on a tile wall:
1.
Preparation:
Clear the area around the wall where you will be working. Protect the floor with a drop cloth or tarp. Gather all the necessary tools and materials. Review the TV mount instructions thoroughly.2.
Locate Wall Studs (Optional but Recommended):
Use a stud finder to locate the wall studs behind the tile. Mark the stud locations with a pencil. If possible, align the TV mount with the studs to provide additional support. Attaching the mount to the studs significantly increases the weight-bearing capacity of the installation.3.
Determine Mounting Location:
Use a measuring tape to determine the desired height and position of the TV on the wall. Consider the viewing angle and the placement of furniture. Mark the location of the TV mount with a pencil.4.
Protect the Tile:
Apply painter's tape to the tile surface where you will be drilling. This will help prevent the drill bit from slipping and reduce the risk of chipping or cracking the tile.5.
Mark Drilling Locations:
Position the TV mount bracket against the wall, aligning it with the marked location. Use a pencil to mark the drilling locations through the mounting holes. Ensure the marks are accurate and aligned with the stud locations (if applicable).6.
Drill Pilot Holes:
Select a diamond-tipped drill bit slightly smaller than the diameter of the anchors you will be using. Start drilling slowly and steadily through the tile. Apply consistent pressure but avoid forcing the drill. Use a spray bottle with water to cool the drill bit and prevent overheating. Drill through the tile until you reach the wall material behind it (drywall, cement board, concrete, etc.).7.
Drill Deeper (if necessary):
If the wall behind the tile is drywall or cement board, switch to a drill bit appropriate for that material and drill to the required depth for the anchors. If the wall is concrete or brick, use a masonry drill bit and drill to the required depth. Regularly remove the drill bit to clear debris.8.
Install Anchors:
Insert the appropriate anchors into the drilled holes. Tap them gently with a hammer if necessary to ensure they are flush with the tile surface. The type of anchor will depend on the wall material behind the tile. For drywall, use drywall anchors designed for heavy loads. For concrete, use concrete anchors or expansion bolts.9.
Mount the Bracket:
Align the TV mount bracket with the installed anchors. Insert the screws through the mounting holes and tighten them securely. Ensure the bracket is level using a level.10.
Attach Mounting Arms to TV:
Attach the mounting arms to the back of the TV, aligning them with the VESA mounting holes. Use the screws that came with the TV mount. Ensure the arms are securely attached.11.
Mount TV on Bracket:
Carefully lift the TV and align the mounting arms with the bracket on the wall. Secure the TV to the bracket according to the TV mount instructions. Ensure the TV is securely attached and cannot be easily dislodged.12.
Cable Management:
Organize and conceal the TV cables using cable ties, cable channels, or other cable management solutions. This will improve the appearance of the installation and prevent cables from dangling.13.
Final Check:
Double-check the stability of the TV mount and the security of all connections. Ensure the TV is level and the cables are properly managed.14.
Clean Up:
Vacuum up any tile dust and debris. Wipe the tile surface with a wet sponge to remove any remaining residue.By following these steps carefully, it is possible to mount a television securely and aesthetically on a tile wall, avoiding cracks and ensuring proper support for the TV's weight.Always prioritize safety and consult with a professional if you are unsure about any aspect of the mounting process.

Best Method To Mount A 70 Tv Above Fireplace On Tile Or Stone Surface Diy Home Improvement Forum

Challenging Fireplace And Kitchen Tv Installs Tech Tips Toys

Can You Mount A Tv On Tile Wall Above Fireplace

How To Mount A Tv On Tile Fyp Explore Homeimprovement Fireplace Shorts Tvmounting Subscribe

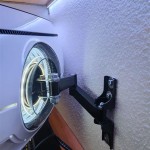
Mounting A Tv To Tile Wall

Tv Wall Mount Mistakes Often Made By Diy Ers

Glass Mosaic Tiled Fireplace Surround With Wall Mounted T V

Tv Wall Mount Installation Snap Install

Mount It Ultra Slim Heavy Duty Tilting Wall For 43 In To 90 Tvs Including Curved Mi 307 The Home

Pro Tv Mounting Plus Updated June 2025 60 Photos Dallas Texas Phone Number Yelp