Onn 43 Inch TV Wall Mount: A Comprehensive Guide
Selecting the appropriate wall mount for a television is a crucial decision that impacts viewing experience, safety, and overall aesthetics. For owners of a 43-inch Onn TV, choosing the right wall mount requires careful consideration of several factors, including VESA compatibility, weight capacity, wall type, desired viewing angle, and available space. This article provides a comprehensive guide to navigating the selection and installation of an Onn 43-inch TV wall mount, ensuring a secure and enjoyable viewing experience.
Understanding VESA Compatibility
VESA, or Video Electronics Standards Association, establishes a standard for mounting interfaces on televisions and monitors. The VESA Mounting Interface Standard (MIS) defines the hole pattern on the back of the display, measured in millimeters, that allows compatibility with wall mounts. The Onn 43-inch TV, like most modern televisions, adheres to a specific VESA standard. Determining the correct VESA size is the first step in selecting a compatible wall mount.
To identify the VESA compatibility of a specific Onn 43-inch TV model, consult the television's user manual or the manufacturer's website. The VESA pattern is typically expressed in millimeters as width x height (e.g., 200mm x 200mm). This measurement indicates the distance between the mounting holes on the back of the TV, both horizontally and vertically. Once the VESA size is known, selecting a wall mount that supports that specific VESA pattern becomes straightforward.
Using an incompatible wall mount with an incorrect VESA pattern can lead to improper installation, instability, and potential damage to the television or the wall. Some wall mounts offer universal compatibility, supporting a range of VESA sizes, often through adjustable mounting arms. However, it's crucial to verify that the chosen mount includes the specific VESA pattern required by the Onn 43-inch TV.
Weight Capacity and Safety Considerations
Weight capacity is another critical factor in selecting a wall mount for an Onn 43-inch TV. The television's weight must be within the wall mount's specified weight limit. Exceeding this limit can compromise the stability and safety of the installation, potentially leading to the TV falling from the wall.
The weight of the Onn 43-inch TV can be found in the product specifications provided in the user manual or on the manufacturer's website. Once the weight is known, select a wall mount that can support at least that weight, and ideally, a slightly higher weight to provide an additional margin of safety. It's generally recommended to choose a mount with a weight capacity that exceeds the TV's weight by at least 20%.
Furthermore, the wall itself must be capable of supporting the combined weight of the television and the wall mount. Installing a TV on a wall that is not structurally sound, such as a thin drywall without proper support, can lead to a hazardous situation. Before installation, confirm that the wall is made of a suitable material, such as wood studs, concrete, or brick. If mounting on drywall, it's imperative to use appropriate anchors that can securely attach to the wall studs behind the drywall. Using only drywall anchors without attaching to studs is generally not recommended for larger TVs like a 43-inch model.
Types of Wall Mounts and Their Applications
Various types of wall mounts are available, each offering different features and benefits. The choice depends on the desired viewing angle, available space, and personal preferences. The primary types include fixed mounts, tilting mounts, and full-motion mounts.
Fixed mounts, also known as flat mounts, position the television close to the wall with minimal adjustability. This type of mount is ideal for situations where the viewing angle is consistent and the TV is viewed from directly in front. Fixed mounts offer a clean, streamlined look and are generally the most affordable option. However, they do not allow for tilting or swiveling, which may be a limitation in some viewing environments.
Tilting mounts allow the television to be tilted vertically, typically forward or downward. This can be useful for reducing glare from windows or lights or for adjusting the viewing angle when the TV is mounted higher than eye level. Tilting mounts provide some flexibility in adjusting the viewing angle but do not offer the ability to swivel the TV from side to side.
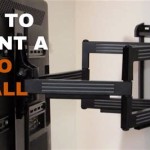
Full-motion mounts, also known as articulating mounts, offer the greatest flexibility in adjusting the viewing angle. These mounts allow the television to be tilted, swiveled, and extended away from the wall. This is particularly useful in situations where the TV needs to be viewed from multiple locations in the room or where access to the back of the TV is required for cable management. Full-motion mounts are generally the most expensive option but provide the most versatility.
Choosing the right type of wall mount depends on the specific needs and preferences of the user. If a simple, clean look is desired and the viewing angle is consistent, a fixed mount may be the best option. If some adjustment of the vertical viewing angle is needed, a tilting mount may be more suitable. For maximum flexibility in adjusting the viewing angle, a full-motion mount is the preferred choice.
Installation Process and Important Considerations
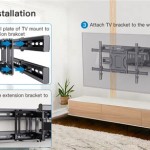
The installation process for a TV wall mount typically involves several steps, including preparing the wall, attaching the mounting brackets to the TV, and securing the mount to the wall. It is crucial to follow the manufacturer's instructions carefully to ensure a safe and secure installation.
Before starting the installation, gather all the necessary tools and materials, including a drill, screwdriver, level, stud finder (if mounting on drywall), measuring tape, and appropriate screws and anchors. Also, ensure there is adequate space around the mounting location to work comfortably and safely.
The first step is to locate the wall studs if mounting on drywall. A stud finder can be used to identify the location of the studs behind the drywall. Mark the stud locations clearly and use them as the primary attachment points for the wall mount. If studs are not available in the desired location, use appropriate drywall anchors that are rated to support the weight of the TV and the mount. It is important to pre-drill pilot holes before screwing in the anchors to prevent the drywall from cracking.
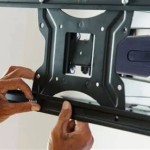
Next, attach the mounting brackets to the back of the Onn 43-inch TV, aligning them with the VESA mounting holes. Use the screws provided with the wall mount to secure the brackets tightly. Ensure that the brackets are level and properly aligned before proceeding.
After attaching the brackets to the TV, carefully lift the TV and attach it to the wall mount. Secure the TV to the mount using the appropriate hardware, ensuring that it is firmly locked in place. Use a level to verify that the TV is perfectly level before tightening all the screws.
Finally, manage the cables neatly and securely. Use cable ties or straps to bundle the cables together and route them behind the TV to minimize clutter. Consider using a cable management system to conceal the cables completely, creating a clean and professional look.
Cable Management and Aesthetics
A well-executed wall mount installation not only provides a secure and stable platform for the television but also enhances the overall aesthetics of the room. Effective cable management is a critical aspect of achieving a clean and professional look.
Before mounting the TV, plan the cable routing carefully. Consider the location of power outlets, HDMI ports, and other connections. Ensure that the cables are long enough to reach the necessary connections without being stretched or strained. Use high-quality HDMI cables and power cords that are designed for wall-mounted TVs.
After mounting the TV, bundle the cables together using cable ties or straps. This prevents the cables from dangling and creating a messy appearance. Route the cables along the wall or behind the TV to minimize visibility. Consider using cable channels or conduit to conceal the cables completely, creating a seamless and uncluttered look.
For a more sophisticated look, consider installing a recessed outlet behind the TV. This allows the power cord and other cables to be hidden within the wall, eliminating the need for unsightly cords running down the wall. Recessed outlets require professional installation and should be installed by a qualified electrician.
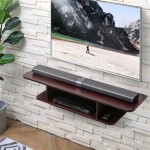
In addition to cable management, consider the overall placement of the TV on the wall. Ensure that the TV is mounted at the appropriate height for comfortable viewing. The ideal height is typically at eye level when seated. Also, consider the surrounding décor and furniture. The TV should be positioned in a way that complements the existing design elements of the room.
Troubleshooting Common Issues
Despite careful planning and execution, some common issues may arise during or after the installation of a TV wall mount. Being prepared to troubleshoot these issues can save time and frustration.
One common issue is difficulty finding wall studs. If a stud finder is not accurate or reliable, try using a manual method, such as tapping on the wall to listen for a solid sound. Another method is to use a small nail or drill bit to probe for studs. If studs cannot be located in the desired location, use appropriate drywall anchors that are rated to support the weight of the TV and the mount.
Another issue is difficulty attaching the mounting brackets to the TV. Ensure that the correct screws are being used and that the brackets are properly aligned with the VESA mounting holes. If the screws are too short or too long, use the appropriate size screws that are compatible with the TV and the mount.
If the TV is not level after installation, use a level to verify the alignment. Adjust the mounting brackets or the wall mount as needed to ensure that the TV is perfectly level. Tighten all the screws securely to prevent the TV from shifting or tilting.
If cables are not long enough to reach the necessary connections, use extension cables or adapters. Ensure that the extension cables are of high quality and compatible with the TV and the other devices. Avoid using too many extension cables, as this can degrade the signal quality.
If the TV is not secure or stable, double-check all the connections and hardware. Ensure that all the screws are tightened securely and that the wall mount is properly attached to the wall. If the wall is not structurally sound, consider reinforcing it or using a different mounting location.
By understanding these common issues and troubleshooting techniques, users can effectively address any problems that may arise during or after the installation of an Onn 43-inch TV wall mount, ensuring a safe and enjoyable viewing experience.

Onn Fixed Wall Mount For 19 To 42 Tvs Ul Listed Holds Up 35 Lbs Black

Onn Full Motion Tv Wall Mount For 50 Inch To 86

Onn Full Motion Tv Wall Mount For 50 To 86 Tvs Ul Listed Swivel 45 Up 15 Tilting

Onn Ultra Slim Full Motion Tv Wall Mount For 50 To 86 Tvs Ul Listed Swivel 45 Up 5 20 Tilting Wal Com

New Wall Mount Screws Set Of Four 4 200 X 100 For Onn 43 100133209 Led Roku Tv

New Hang Onn Fixed Tv Wall Mount Bracket For 17 To 42 Tvs Holds Up 66 Lbs

Onn 100012584 Tv Review Consumer Reports

Onn Tv Wall Mount Replacement Hardware Kit 69 Pieces

Onn 100010103 Fixed Tv Wall Mount Manual Manualslibraryy

Onn Tv Mount Full Motion Tilting Wall Mounts