Roku 65 Inch TV Wall Mount: A Comprehensive Guide
Mounting a 65-inch Roku TV on a wall can significantly enhance the viewing experience and optimize space utilization. This process, however, requires careful consideration of several factors, including the selection of an appropriate wall mount, understanding the TV's specifications, and ensuring a secure and level installation. This guide provides a comprehensive overview of mounting a 65-inch Roku TV, covering essential aspects from selecting the right mount to the practical steps involved in the installation process.
The size and weight of a 65-inch Roku TV necessitate a robust and reliable wall mount. Different types of wall mounts cater to varying needs and preferences, ranging from fixed mounts for a streamlined profile to full-motion mounts that offer maximum flexibility. Understanding the strengths and limitations of each type is crucial for making an informed decision.
Understanding VESA Compatibility
Before purchasing a wall mount, it is imperative to determine the Video Electronics Standards Association (VESA) compatibility of the Roku TV. VESA is a standard that defines the distance in millimeters between the four mounting holes on the back of a TV. This measurement is expressed as width x height (e.g., 400x400mm). The VESA specification ensures that the wall mount aligns correctly with the TV's mounting points. The user manual or the manufacturer's website typically provides the VESA information for a specific TV model. Confirming the VESA compatibility is non-negotiable to avoid compatibility issues during installation.
Failure to adhere to the correct VESA specification can result in an unstable or even unsafe installation. Using the wrong size screws or a mount that does not align properly can damage the TV or cause it to detach from the wall, posing a significant safety hazard. Therefore, verifying the VESA compatibility is the initial and perhaps the most critical step in the wall-mounting process.
Once the VESA compatibility is established, the weight capacity of the wall mount must be assessed. Each wall mount is rated for a maximum weight limit, and it is essential to ensure that the TV's weight does not exceed this limit. Exceeding the weight capacity can compromise the structural integrity of the mount and increase the risk of failure. Refer to the TV's specifications to determine its weight, and select a wall mount that can safely support that weight with some margin for added security.
Types of Wall Mounts
Several types of wall mounts are available, each offering distinct advantages and disadvantages. The choice depends on individual viewing preferences, room layout, and desired level of flexibility.
Fixed Mounts: These mounts are the simplest and most affordable option. They hold the TV flush against the wall, offering a clean and minimalist appearance. Fixed mounts are ideal for situations where the viewing angle does not need to be adjusted. However, they provide limited access to the back of the TV for cable management.
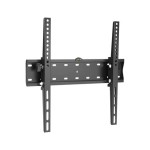
Tilting Mounts: These mounts allow the TV to be tilted up or down, reducing glare and improving the viewing angle from different seating positions. Tilting mounts are especially useful in rooms with high ceilings or where the TV is mounted above eye level. They offer a slight degree of adjustability but do not provide side-to-side movement.
Full-Motion Mounts: Also known as articulating mounts, these are the most versatile option. They allow the TV to be extended, tilted, and swiveled, providing a wide range of viewing angles. Full-motion mounts are ideal for multi-purpose rooms or situations where the TV needs to be viewed from different locations. They offer maximum flexibility but are generally more expensive than fixed or tilting mounts. Consider its weight especially when a 65-inch TV is installed. Ensure the mount can hold it.
Low-Profile Mounts: Similar to fixed mounts, low-profile mounts keep the TV close to the wall, but they may offer slightly more space for cable management. They are a good compromise between fixed mounts and more adjustable options.
Essential Tools and Materials
Proper installation requires a specific set of tools and materials to ensure a safe and secure mount. Having these items ready before starting the process will streamline the installation and minimize potential problems.
Stud Finder: A stud finder is essential for locating wall studs, which are the structural supports behind the drywall. Mounting the TV to the studs provides the necessary stability to support the weight of the TV. Electronic stud finders are generally more accurate than magnetic ones.
Level: Ensuring that the TV is perfectly level is crucial for an aesthetically pleasing viewing experience. A bubble leveler or a digital level can be used to verify the horizontal alignment of the mount.
Drill with Drill Bits: A power drill is needed to create pilot holes for the mounting screws. The drill bit size should be slightly smaller than the diameter of the screws. A variety of drill bits may be necessary for different wall materials.
Screwdriver: A screwdriver, either manual or powered, is required to tighten the mounting screws. The appropriate screwdriver bit size should match the screw heads to prevent stripping.
Pencil: A pencil is used to mark the location of the studs and the mounting holes on the wall.
Measuring Tape: A measuring tape is needed to determine the desired height of the TV and to ensure accurate placement of the mount.
Wall Mount Hardware: The wall mount typically comes with a set of screws, washers, and spacers. It is essential to use the correct hardware for the specific wall type. If the included hardware is not suitable, purchase appropriate alternatives from a hardware store.
Cable Management Accessories: Cable ties, cable sleeves, and wall plates can help organize and conceal the cables connecting to the TV, creating a cleaner and more professional appearance.
Safety Glasses: Wearing safety glasses protects the eyes from debris during drilling and installation.
Gloves: Gloves provide a better grip and protect the hands from scratches and cuts.
Step-by-Step Installation Guide
The installation process involves several key steps, each requiring careful attention to detail. Following these steps will ensure a safe and secure installation.
1. Locate Wall Studs: Use a stud finder to identify the location of the wall studs. Mark the center of each stud with a pencil. The wall mount must be securely attached to the studs to support the weight of the TV. Most wall mounts require attachment to at least two studs.
2. Position the Wall Mount Bracket: Hold the wall mount bracket against the wall, aligning it with the marked stud locations. Use a level to ensure that the bracket is perfectly horizontal. Mark the locations of the mounting holes on the wall through the bracket.
3. Drill Pilot Holes: Use a drill with an appropriate drill bit to create pilot holes at the marked locations on the wall. The pilot holes should be deep enough to accommodate the mounting screws. If drilling into concrete or brick, use a masonry drill bit.
4. Attach the Wall Mount Bracket: Align the wall mount bracket with the pilot holes and secure it to the wall using the provided mounting screws. Ensure that the screws are tightened firmly but not over-tightened, which could damage the wall or the bracket. Use washers to distribute the pressure evenly.
5. Attach the Mounting Arms to the TV: Attach the mounting arms to the back of the TV using the screws provided with the wall mount. Ensure that the screws are the correct length and diameter for the TV's mounting holes. Use spacers if necessary to prevent the screws from bottoming out in the TV.
6. Connect Cables: Before mounting the TV on the wall, connect all necessary cables, such as HDMI cables, power cords, and audio cables. This will make it easier to access the connections after the TV is mounted.
7. Mount the TV on the Wall Bracket: Carefully lift the TV and align the mounting arms with the wall bracket. Secure the TV to the bracket using the locking mechanisms provided with the wall mount. This may require two people, especially for a 65-inch TV, to ensure safe and stable placement.
8. Level the TV: Use a level to ensure that the TV is perfectly horizontal. If necessary, adjust the position of the TV on the bracket to achieve a level alignment.
9. Secure the Locking Mechanisms: Once the TV is level, secure all locking mechanisms on the wall mount to prevent the TV from accidentally detaching from the wall. These mechanisms may include screws, clips, or other fasteners.
10. Cable Management: Arrange the cables neatly and conceal them using cable ties, cable sleeves, or wall plates. This will improve the appearance of the installation and prevent the cables from becoming tangled or damaged.
11. Test the Installation: Turn on the TV and verify that it is functioning properly. Check the viewing angle and make any necessary adjustments to the tilt or swivel of the mount.
12. Final Inspection: Double-check all connections and mounting hardware to ensure that everything is secure and properly installed.
By following these steps carefully, an individual can safely and securely mount a 65-inch Roku TV on the wall, enhancing the viewing experience and optimizing space utilization. However, if there is any doubt about the ability to perform the installation correctly, it is always best to seek professional assistance.

Roku 65 Inch Select Series 4k Hdr S Tv And Onn Full Motion Wall Mount For 50 To 86 Tvs Up 15 Tilting Wal Com

Roku 65 Inch Select Series 4k Hdr S Tv And Onn Full Motion Wall Mount For 50 To 86 Tvs Up 15 Tilting

Pro Series Tv Wall Mount Kit Roku 65

Roku Wall Mount Kit For 65 Pro Series Tv Ultra Slim With Minimalist Flat Design Hinged Easy Access To Cables Black 65rwm Best

Wall Mount Tv Tilt Black For 5 In To 86 S Wal Com

Roku Pro Series Tv Wall Mount

Pro Series Tv Wall Mount Kit Roku 65

Roku 65 Inch Select Series 4k Hdr S Tv And Onn Full Motion Wall Mount For 50 To 86 Tvs Up 15 Tilting

Tcl 65 Inch 4k Tv Wall Mounting Qled Fixable Bracket Fitting Youtube

Roku 65 Inch Select Series 4k Hdr S Tv And Onn Full Motion Wall Mount For 50 To 86 Tvs Up 15 Tilting Wal Com