Samsung Odyssey Ark Wall Mount: A Comprehensive Guide
The Samsung Odyssey Ark represents a significant advancement in gaming monitor technology, offering an immersive and expansive viewing experience. Its curved 55-inch display and unique multi-view capabilities make it a compelling choice for gamers and content creators. However, the sheer size and weight of the Ark present a practical challenge: optimal mounting. While the included stand provides a stable base, wall mounting presents an alternative that can free up desk space, improve viewing angles, and enhance the overall aesthetic of a gaming or workspace.
This article provides a comprehensive guide to wall mounting a Samsung Odyssey Ark, covering essential considerations, VESA compatibility, mounting options, installation procedures, and potential issues. It aims to equip individuals with the necessary knowledge to safely and effectively mount the Odyssey Ark, maximizing its potential and optimizing the user experience.
Understanding the VESA Compatibility of the Odyssey Ark
The Video Electronics Standards Association (VESA) has established a standard for mounting interfaces on televisions and monitors. This standard ensures compatibility between displays and wall mounts, simplifying the selection and installation process. The VESA Mounting Interface Standard (MIS) specifies the distance in millimeters between the four mounting holes on the back of the display. These dimensions are crucial for selecting a compatible wall mount.
The Samsung Odyssey Ark utilizes a specific VESA mounting pattern. It is imperative to consult the official product specifications or the user manual to determine the correct VESA size. This information is typically expressed as two numbers representing the horizontal and vertical distance between the mounting holes (e.g., 200x200mm). Using an incompatible wall mount can result in instability, damage to the display, or even complete failure of the mounting system.
Furthermore, it is critical to consider the weight of the Odyssey Ark when selecting a wall mount. The mount must be rated to support the display's weight, including the stand components if they are not removed. Exceeding the weight limit of the mount poses a significant safety risk. Always choose a wall mount with a weight capacity exceeding the Ark’s weight by a safe margin.
Exploring Wall Mount Options for the Odyssey Ark
Several types of wall mounts are available, each offering different features and benefits. The selection depends on the desired viewing experience, room layout, and budget. Understanding the various options is crucial for making an informed decision.
Fixed Wall Mounts: These mounts provide a static position, holding the display close to the wall. Fixed mounts are the simplest and often the most affordable option. They are suitable for situations where a fixed viewing angle is acceptable and minimal adjustability is required. However, they offer no tilt, swivel, or extension capabilities.
Tilting Wall Mounts: Tilting mounts allow for vertical adjustment of the display angle. This can be beneficial for reducing glare or improving viewing comfort when the display is mounted high on the wall. The tilting mechanism typically allows for a few degrees of upward or downward tilt. This type of mount offers a basic level of adjustability without the complexity and cost of full-motion mounts.
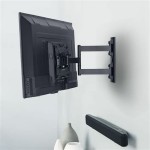
Full-Motion Wall Mounts: Also known as articulating mounts, these provide the greatest flexibility. Full-motion mounts allow for tilt, swivel, and extension, enabling the user to position the display precisely as desired. They are ideal for situations where multiple viewing positions are needed or when the display needs to be angled around corners. Full-motion mounts are generally more expensive and require more complex installation than fixed or tilting mounts.
Considerations for selecting a Wall Mount: The thickness of the wall, the presence of studs, and the desired proximity of the display to the wall, are all key factors in selecting the appropriate wall mount. For instance, solid concrete or brick walls may require different types of anchors than drywall. The distance between wall studs will determine the type of mount that can be used or if additional support structures need to be installed.
Installing the Wall Mount: A Step-by-Step Guide
The installation process requires careful planning and execution to ensure a secure and stable mounting. Improper installation can lead to damage to the display, the wall, or potential injury.
Preparation: Before beginning the installation, gather all necessary tools and materials. This includes the wall mount itself, a stud finder (if mounting to drywall), a level, a drill, appropriate drill bits (for wood studs, concrete, or brick), a screwdriver, a measuring tape, and a pencil. Verify that the wall is capable of supporting the weight of the Odyssey Ark and the mount.
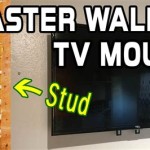
Locating Wall Studs (for Drywall): Use a stud finder to identify the location of wall studs. Studs are vertical beams that provide structural support. Mounting the wall mount directly to studs is crucial for stability. Mark the location of the studs clearly. If studs are not aligned with the desired mounting location, additional support structures may be required. Consider consulting a professional installer in such cases.
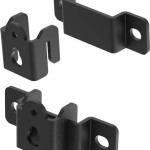
Attaching the Mounting Bracket to the Display: Carefully attach the mounting bracket to the back of the Odyssey Ark using the provided screws. Ensure the bracket is aligned correctly with the VESA mounting holes. Do not overtighten the screws, as this can damage the display. Refer to the wall mount's instructions for the specific screw size and tightening torque.
Attaching the Wall Plate to the Wall: Position the wall plate at the desired location on the wall, ensuring it is level. Mark the screw hole locations on the wall using a pencil. Drill pilot holes at the marked locations. If mounting to wood studs, use wood screws to secure the wall plate. If mounting to concrete or brick, use appropriate anchors and screws designed for those materials. Ensure the wall plate is securely attached to the wall.
Hanging the Display on the Wall Plate: Carefully lift the Odyssey Ark and align the mounting bracket with the wall plate. Secure the display to the wall plate according to the mount's instructions. Most mounts have a locking mechanism to prevent the display from accidentally detaching.
Cable Management: Organize and manage the cables to prevent them from dangling or creating a mess. Use cable ties or cable management sleeves to bundle the cables together. Consider running the cables through the wall for a cleaner look. This often involves installing a cable pass-through plate.
Testing and Adjustments: Once the display is mounted, test its stability by gently moving it. Ensure the mount is secure and the display is level. Make any necessary adjustments to the tilt, swivel, or extension to achieve the desired viewing angle.
Addressing Potential Issues and Troubleshooting
Installation challenges can arise, requiring troubleshooting and adjustments to ensure a successful outcome. Addressing potential issues preemptively can save time and effort.
Incompatible Wall Mount: If the wall mount does not align with the VESA mounting holes on the back of the Odyssey Ark, it is incompatible and should not be used. Using an incompatible mount can damage the display. Return the mount and purchase a compatible one.
Insufficient Weight Capacity: If the wall mount is not rated to support the weight of the Odyssey Ark, it will be unstable and unsafe. The mount may sag or fail completely. Replace the mount with one that has a higher weight capacity.
Weak Wall: If the wall is not strong enough to support the weight of the display, it may flex or even collapse. This is especially common with drywall walls. Reinforce the wall by adding additional support structures or consulting a professional installer.
Difficulty Locating Studs: Stud finders may not always be accurate. Try using multiple stud finders or manually tapping on the wall to locate the studs. If you are unable to locate the studs, consult a professional installer.
Stripped Screws or Holes: If the screws strip or the holes become enlarged, the connection will be weak. Use longer screws or fill the holes with wood filler or epoxy before re-drilling. In extreme cases, you may need to relocate the wall plate to a different location on the wall.
Cable Management Issues: If the cables are difficult to manage, consider using cable ties, cable management sleeves, or cable raceways to organize and conceal them. Running the cables through the wall can also improve the appearance.
Safety Precautions: Prioritize safety throughout the installation process. Disconnect the power supply before beginning any work. Wear safety glasses to protect your eyes from debris. Use caution when lifting the Odyssey Ark, as it is heavy and bulky. If you are unsure about any aspect of the installation, consult a professional installer.

Genuine Samsung Wall Mount Vesa Adapter Bracket For Ls55bg970n Odyssey Ark

Samsung Launches Upgraded Odyssey Ark 2nd Gen In Singapore For Enhanced Gaming Experience Newsroom

Genuine Samsung Wall Mount Vesa Adapter Bracket For Ls55bg970n Odyssey Ark

Samsung S 55 Inch Odyssey Ark Taking Gaming Monitors To A Whole New Dimension

The Samsung Odyssey Ark Is A Ginormous Glorious Gaming Monitor And Tv Hardwarezone Com Sg

Samsung G9 Odyssey Wall Mount 2024

55 65 Auto Rotating Wall Mount 400x300 Vesa Compatible Television Home Theater Accessories Vg Arab43wmtza Samsung Us

Samsung S 3 500 Odyssey Ark Is A 55 Curved 4k Monitor With Impressive Specs Digital Photography Review

Genuine Samsung Wall Mount Vesa Adapter Bracket For Ls55bg970n Odyssey Ark Uk

The Samsung Odyssey Ark Is A Ginormous Glorious Gaming Monitor And Tv Hardwarezone Com Sg