Securing Your Entertainment: A Comprehensive Guide to Wall Mounting a TCL Roku TV 43-Inch Model
The TCL Roku TV 43-inch model offers a compelling combination of smart features and a compact screen size, making it a popular choice for various living spaces. While these TVs can be placed on a stand, wall mounting presents a space-saving and aesthetically pleasing alternative. This article provides a detailed guide to successfully and safely wall mounting a TCL Roku TV 43-inch, covering necessary equipment, preparation steps, and installation procedures.
Before embarking on the wall mounting process, it is essential to understand the benefits. Mounting a television on the wall frees up valuable floor space, especially in smaller rooms or apartments. It also allows for optimal viewing angles, as the TV can be positioned at the ideal height for comfortable viewing. Furthermore, wall mounting can enhance the overall aesthetic of a room by creating a cleaner, more modern look. However, proper planning and execution are critical to ensure the TV is securely mounted and the installation is safe.
Key Point 1: Determining Compatibility and Gathering Necessary Tools
The first step in wall mounting a TCL Roku TV 43-inch involves confirming compatibility with the intended wall mount. Television manufacturers adhere to the Video Electronics Standards Association (VESA) standard, which specifies the screw hole pattern on the back of the TV used for mounting. The VESA pattern is expressed in millimeters, for example, 200x200 mm. To determine the VESA compatibility of a specific TCL Roku TV 43-inch model, consult the user manual or the manufacturer's website. This information is crucial for selecting the correct wall mount.
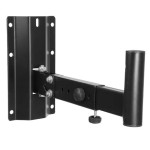
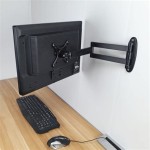
Once the VESA pattern is confirmed, the appropriate wall mount can be chosen. Wall mounts are available in various types, including fixed, tilting, and full-motion mounts. Fixed mounts hold the TV flush against the wall, offering the most streamlined appearance. Tilting mounts allow the TV to be angled vertically, reducing glare or improving viewing angles from different positions in the room. Full-motion mounts provide the greatest flexibility, allowing the TV to be extended, swiveled, and tilted in multiple directions. The choice of mount depends on individual viewing preferences and the layout of the room.
In addition to the wall mount, several tools are required for the installation process. These include:
- Stud finder: To locate wall studs for secure mounting.
- Level: To ensure the TV is mounted straight.
- Drill with appropriate drill bits: For pilot holes and mounting screws.
- Screwdriver: To tighten screws securely.
- Measuring tape: To accurately measure and mark the mounting location.
- Pencil: To mark the wall.
- Safety glasses: To protect eyes from debris.
- Gloves: To protect hands.
It is also beneficial to have a helper to assist with lifting and positioning the TV, as the 43-inch models, while not excessively heavy, can be awkward to maneuver alone.
Key Point 2: Preparing the Wall and TV for Mounting
Before physically attaching the TV to the wall, proper preparation is essential. The first step is to locate the wall studs using a stud finder. Wall studs are vertical beams within the wall that provide structural support. Mounting the TV directly to the studs is crucial for ensuring stability and preventing the TV from falling. Mark the location of the studs clearly on the wall using a pencil.
If the desired mounting location does not align with the wall studs, a bridging solution may be necessary. Bridging involves attaching a horizontal piece of wood or metal to the studs and then attaching the wall mount to the bridging material. This distributes the weight of the TV across multiple studs, providing adequate support. It is crucial to consult with a professional for advice on bridging, especially for heavier TVs or in situations where the wall construction is uncertain.
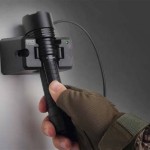
Once the stud locations are identified, the next step is to prepare the TV for mounting. Most wall mounts come with mounting brackets that attach to the VESA holes on the back of the TV. Follow the instructions provided with the wall mount to attach the brackets to the TV using the appropriate screws. Ensure the screws are tightened securely, but avoid over-tightening, which can damage the TV's housing. Before attaching the brackets, it is prudent to disconnect all cables from the TV to prevent damage during the mounting process. It's also useful to take pictures of the cable connections before disconnecting, to aid in reconnecting them later.
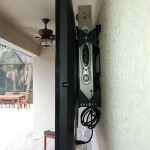
Consider the height at which the TV will be mounted. The ideal height is typically at eye level when seated. Measure the distance from the floor to eye level and add or subtract as needed to account for the height of the TV and the mount. Mark the desired height on the wall to serve as a visual guide during the mounting process. Hiding cables is another important consideration. Running cables inside the wall offers the cleanest aesthetic, but this requires more extensive preparation and may necessitate professional installation. Alternatively, cable management solutions such as cable concealers or ties can be used to organize and hide cables along the wall.
Key Point 3: Mounting the TV and Completing the Installation
With the wall and TV prepared, the physical mounting process can begin. Attach the wall plate to the wall, aligning it with the marked stud locations. Use a level to ensure the wall plate is perfectly horizontal. Drill pilot holes into the studs, using a drill bit that is slightly smaller than the diameter of the mounting screws. Secure the wall plate to the studs using the provided mounting screws. It is crucial to use screws that are long enough to penetrate deeply into the studs, but not so long that they protrude through the wall.
With the wall plate securely installed, the TV can be lifted and attached to the mount. This step typically requires two people, as the TV can be heavy and awkward to handle. Carefully align the mounting brackets on the back of the TV with the corresponding slots or hooks on the wall plate. Gently lower the TV onto the wall plate, ensuring the brackets are securely engaged. Some wall mounts have locking mechanisms to prevent the TV from accidentally dislodging.
Once the TV is mounted, double-check the level to ensure it is perfectly straight. Make any necessary adjustments to fine-tune the position. Reconnect all cables to the TV, referring to the previously taken photos if needed. Organize the cables using cable management solutions to create a neat and tidy appearance. Test the TV to ensure it is functioning properly. Check the picture quality, sound, and all input sources. If any issues are encountered, troubleshoot the connections and settings. Finally, clean up any debris or packing materials from the installation area.
It is crucial to be aware of potential hazards during the wall mounting process. Working at heights can be dangerous, so use a stable ladder and take precautions to prevent falls. Power tools can also pose risks, so wear safety glasses and gloves, and follow the manufacturer's instructions carefully. If uncomfortable with any aspect of the installation process, it is advisable to consult with a professional installer. Professionals have the expertise and equipment to ensure the TV is mounted safely and securely.
While this guide provides a comprehensive overview of the wall mounting process, specific details may vary depending on the chosen wall mount and the particular TCL Roku TV 43-inch model. Always refer to the instructions provided with the wall mount and the TV's user manual for detailed guidance. Taking the time to plan and execute the installation carefully will result in a safe, aesthetically pleasing, and functional wall-mounted TV setup.
Consider the long-term maintenance of the wall-mounted TV. Periodically check the mounting screws to ensure they remain tight. Dust the TV screen and the surrounding area regularly to prevent the build-up of dirt and grime. Avoid placing objects on top of the TV, as this can damage the screen or interfere with ventilation. With proper care and maintenance, a wall-mounted TCL Roku TV 43-inch can provide years of enjoyable viewing.
Furthermore, consider the resale value or future relocation of the TV. If the TV is to be removed from the wall at a later date, it is important to keep the original packaging and mounting hardware. Patching and repairing the wall after removing the mount may be necessary, depending on the type of mount and the condition of the wall. Planning for these future contingencies can simplify the process of moving or reselling the TV.
Finally, remember to dispose of any packaging materials responsibly. Recycle whenever possible and follow local regulations for waste disposal. A well-planned and executed wall mounting project can significantly enhance the viewing experience and the overall aesthetic of the living space. However, safety should always be the top priority, and professional assistance should be sought if needed.

Tcl How To Choose The Correct Wall Mount

Tcl How To Choose The Correct Wall Mount

43 Tcl Roku Tv How To Install On Perlesmith Mount

Complete Step By How To Mount Flat Screen Tv Tcl 43 Roku

Tcl 43 Class 4 Series 4k Uhd Hdr Roku S Tv 43s425 Ca Canada

Tcl 43p6k 55p6k 65p6k S Google Tv Led 43 55 65 Inch P6k 4k Uhd Hdr

Tcl How To Choose The Correct Wall Mount

Ask Tcl Mounting Your Tv Usa

Tcl 43s446 43 Inch Class 4 Series 4k Uhd Hdr S Google Tv 2024 Model Bundle With Premiere Streaming 37 100 Wall Mount 6 Outlet

How To Attach A 55 Inch Roku Tcl 4k S Tv Wall Mount