TV Mounts for Plaster Walls: A Comprehensive Guide
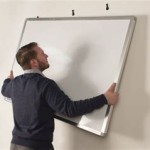
Mounting a television on a plaster wall presents unique challenges compared to drywall or concrete. Plaster, a mixture of lime, sand, and water (sometimes with other additives like gypsum, cement, or fibers), offers a rigid surface but can be prone to crumbling or cracking under excessive stress. Securely mounting a TV requires careful consideration of the wall's structural integrity and the appropriate hardware and techniques. This article will provide a detailed guide to selecting and installing a TV mount on a plaster wall, emphasizing safety and long-term stability.
The primary concern with plaster walls is their inherent fragility. Unlike drywall, which is relatively uniform in composition and density, plaster walls often consist of multiple layers applied over wood lath or, in some cases, metal lath. The lath provides a substrate for the plaster to adhere to, but the plaster itself can be weak, especially if it is old or has been subjected to moisture damage. The thickness of the plaster layer can also vary, making it difficult to locate solid points for mounting. Simply driving screws into the plaster is unlikely to provide sufficient support for a TV, leading to potential wall damage and the risk of the TV falling.
Therefore, the key to successfully mounting a TV on a plaster wall lies in finding and utilizing the wall studs. Wall studs are vertical wooden or metal beams that provide the primary structural support for the wall. They are typically spaced 16 or 24 inches apart. By attaching the TV mount directly to the studs, the weight of the TV is distributed across a stable and load-bearing element of the wall. If studs are not accessible or appropriately positioned for the desired TV placement, alternative mounting methods may be considered, although these require careful evaluation and implementation.
Identifying Wall Studs in Plaster Walls
Locating wall studs is arguably the most critical step in the mounting process. Several methods can be employed, ranging from simple manual techniques to more sophisticated electronic tools.
Manual Methods: The most basic method involves tapping lightly on the wall surface. A solid sound generally indicates the presence of a stud, while a hollow sound suggests an empty space between studs. This method requires practice and a good ear, as variations in plaster thickness can make it difficult to discern subtle differences in sound. Another technique involves using a stud finder specifically designed for drywall. These stud finders typically work by detecting changes in density behind the wall surface. However, their accuracy can be affected by the thickness and composition of the plaster, as well as by the presence of metal lath or other obstructions. Magnetic stud finders can be used to locate nails or screws that are already securing the plaster to the studs. By identifying these fasteners, the location of the studs can be inferred. This method is particularly effective if the wall has been previously painted, as the paint may highlight the presence of fasteners.
Electronic Stud Finders: Electronic stud finders offer a more reliable and accurate method for locating studs. These devices utilize sensors to detect changes in density or dielectric constant behind the wall surface. There are two main types of electronic stud finders: edge finders and center finders. Edge finders indicate the edges of a stud, while center finders identify the center of the stud. Center finders are generally preferred, as they provide a more precise indication of the stud's location. When using an electronic stud finder on a plaster wall, it is important to calibrate the device correctly and to move it slowly and steadily across the wall surface. Multiple passes may be necessary to confirm the location of the studs. Some electronic stud finders are also equipped with features that can detect live electrical wiring, which is an important safety consideration when working with walls.
Confirming Stud Location: Regardless of the method used to locate the studs, it is essential to confirm their location by driving a small nail or screw into the wall. This will verify that the stud finder is accurate and that the stud is sufficiently solid to support the TV mount. Start with a small pilot hole to minimize damage to the plaster. If the nail or screw encounters resistance, it is likely hitting a solid stud. If it passes through easily, it is likely hitting an empty space. Repeat this process at several points along the suspected stud location to ensure that it runs vertically and that it is not obstructed by pipes or wiring.
Selecting the Appropriate TV Mount
Choosing the right TV mount is crucial for ensuring the safety and stability of the installation. Several factors should be considered, including the size and weight of the TV, the desired viewing angle, and the stud spacing in the wall.
TV Size and Weight: The first step is to determine the weight and dimensions of the TV. This information can be found in the TV's user manual or on the manufacturer's website. The TV mount should be rated to support the weight of the TV with a significant margin of safety. It is generally recommended to choose a mount that is rated for at least twice the weight of the TV. The dimensions of the TV will also determine the appropriate size of the mount. The mount should be wide enough to accommodate the TV's mounting holes (VESA pattern) and to securely attach to the wall studs.
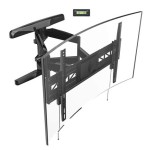
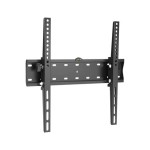
Mount Type: There are several types of TV mounts available, each with its own advantages and disadvantages. Fixed mounts are the simplest and most affordable type of mount. They hold the TV flush against the wall, providing a clean and minimalist look. Tilting mounts allow the TV to be tilted up or down, which can help to reduce glare and improve viewing angle. Full-motion mounts, also known as articulating mounts, allow the TV to be extended, swiveled, and tilted in multiple directions. This provides the greatest flexibility in viewing angle, but these mounts are also the most expensive and require the most space. For plaster walls, it's important to consider the weight and leverage of the mount, especially for full-motion mounts. A lighter weight mount is generally preferred to minimize stress on the plaster.
Stud Spacing: The stud spacing in the wall will also influence the choice of TV mount. Most TV mounts are designed to attach to studs that are spaced 16 or 24 inches apart. If the stud spacing in the wall is different, it may be necessary to use a mounting plate or adapter to bridge the gap. It is also important to ensure that the mount is wide enough to span the studs and that the mounting holes are aligned with the studs. If the studs are not located in the ideal position for the desired TV placement, it may be necessary to shift the TV slightly to one side or the other. This can be accomplished by using a full-motion mount or by using a mounting plate that allows for lateral adjustment.
Material and Construction: The TV mount should be made of high-quality materials and constructed to withstand the weight and movement of the TV. Look for mounts that are made of steel or aluminum and that have been tested to ensure their strength and durability. The mount should also have a smooth and durable finish to prevent corrosion and to ensure that it will last for many years.
Installation Techniques for Plaster Walls
Proper installation is paramount for ensuring the safety and longevity of a TV mount on a plaster wall. This section outlines the recommended techniques for attaching the mount to the wall studs.
Pilot Holes: Before driving any screws into the studs, it is essential to drill pilot holes. This will prevent the studs from splitting and will make it easier to drive the screws straight. The pilot holes should be slightly smaller than the diameter of the screws. Use a drill bit that is appropriate for the type of wood in the studs. The depth of the pilot holes should be slightly longer than the length of the screws.
Fasteners: Use high-quality lag screws or structural screws to attach the TV mount to the wall studs. These screws are designed to provide a strong and secure connection. Avoid using drywall screws, as they are not strong enough to support the weight of a TV. The length of the screws should be sufficient to penetrate deeply into the studs. A general rule of thumb is to use screws that are at least 2.5 inches long. The diameter of the screws should be appropriate for the size of the mounting holes in the TV mount. Use washers under the screw heads to distribute the load and to prevent the screws from pulling through the mounting holes. Ensure the screw head diameter is adequate for the mounting bracket holes.
Minimizing Plaster Damage: When drilling pilot holes and driving screws, take care to minimize damage to the surrounding plaster. Use a sharp drill bit and apply gentle pressure to avoid cracking or crumbling the plaster. If the plaster is particularly fragile, consider using a countersink bit to create a recess for the screw heads. This will help to prevent the screw heads from protruding and damaging the plaster. Avoid over-tightening the screws, as this can also cause the plaster to crack. Tighten the screws until they are snug, but not so tight that they are putting excessive pressure on the plaster.
Securing to Lath: The ideal mounting scenario involves securing the TV mount directly to the wall studs. However, in some cases, it may be necessary to also secure the mount to the wooden lath behind the plaster. If this is the case, use screws that are long enough to penetrate the lath and to provide a secure connection. Consider using toggle bolts or molly bolts to provide additional support. These fasteners are designed to expand behind the lath, creating a strong and secure anchor. However, it is important to note that these fasteners should only be used as a supplement to the primary attachment to the wall studs. They should not be relied upon to support the full weight of the TV.
Cable Management: Plan for cable management before mounting the TV. This will help to keep the cables organized and out of sight. Consider running the cables through the wall or using cable ties to bundle them together. Use a cable management system to conceal the cables and to protect them from damage. This will also improve the appearance of the installation. Concealing the cables by running them through the wall will require drilling holes, so confirm the placement of any electrical wiring or plumbing beforehand.
By carefully following these guidelines, it is possible to securely and safely mount a TV on a plaster wall. Remember to prioritize safety and to take the time to properly assess the wall's structural integrity before beginning the installation.

How To Mount Tv On Plaster Lath Wall Magnetic Stud Finder For Walls Youtube

Mounting Tv On Plaster Wall No Studs

How To Mount Tv On Plaster Wall Easily Magnetic Stud Finder Tips Youtube

One Stud Tv Mount In Plaster Wall Or Drywall Why Only Youtube

How To Mount A Tv On Plaster Wall Without Studs Easily Installation Toronto

How To Hang A Tv On Plaster Wall Best Anchoring Practices

Tbolt Heavy Duty Metal Plasterboard Fixing Tv Mounting Kit 4 Pack Holds Up To 65kg Per

Mouting Tv Bracket To Plasterboard Wall Diynot Forums

Tv Wall Mounting Service Guide To Diffe Methods Install My Antenna

How To Hang A Tv On Plaster Wall Best Anchoring Practices