Vizio 55 Inch TV Wall Mount: A Comprehensive Guide
Mounting a Vizio 55 inch TV onto a wall can significantly enhance the viewing experience and free up valuable floor space. This process, while relatively straightforward for experienced DIY enthusiasts, requires careful planning and execution to ensure the TV is securely mounted and functions optimally. This article provides a comprehensive guide to wall mounting a Vizio 55 inch TV, covering essential considerations, necessary tools, step-by-step instructions, and troubleshooting tips.
Key Point 1: Pre-Installation Assessment and Planning
Before commencing the wall mounting process, a thorough assessment of several factors is crucial. Failure to consider these elements can lead to complications and potential damage to the TV or the wall itself. The key aspects to evaluate include wall type, stud location, mount compatibility, and desired viewing angle.
Wall Type Verification: Identifying the type of wall is paramount. Common wall types include drywall, plaster, brick, and concrete. Drywall, while prevalent in residential construction, requires specific mounting techniques due to its relatively weak structure. Plaster walls can present challenges similar to drywall, often requiring reinforcement. Brick and concrete walls, on the other hand, offer greater structural integrity but necessitate specialized drilling equipment and anchors. Using a stud finder is essential to locate wall studs behind the drywall.
Stud Location Determination: Wall studs are vertical wooden or metal beams that provide structural support within the wall. Mounting the TV directly onto wall studs is the most secure method, especially for larger and heavier TVs like a 55-inch Vizio. A stud finder, available in electronic or magnetic versions, assists in locating these studs. Electronic stud finders typically use sensors to detect changes in density behind the wall's surface, while magnetic stud finders identify metal fasteners used to attach the drywall to the studs. Once located, the stud positions should be clearly marked with a pencil or painter's tape.
VESA Compatibility Check: VESA (Video Electronics Standards Association) standards define the mounting interface on the back of TVs. This standard dictates the spacing and size of the screw holes used to attach the TV to the wall mount. The VESA specification for a Vizio 55 inch TV is typically found in the TV's user manual or on the Vizio website. Common VESA sizes for 55-inch TVs include 200x200 mm, 300x200 mm, and 400x200 mm. Ensuring the selected wall mount is compatible with the TV's VESA pattern is critical for a secure and proper fit.
Viewing Angle Consideration: The desired viewing angle plays a significant role in determining the optimal mounting height. Ideally, the center of the TV screen should be at eye level when seated in the primary viewing location. This minimizes neck strain and ensures a comfortable viewing experience. Factors such as sofa height, distance from the wall, and personal preferences should be taken into account when calculating the optimal mounting height.
Key Point 2: Selection of Appropriate Mounting Hardware and Tools
Choosing the correct wall mount and gathering the necessary tools are crucial steps in the wall mounting process. Using the wrong type of mount or lacking the proper tools can lead to installation difficulties and potentially compromise the TV's stability.
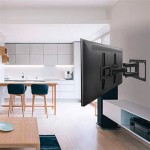
Wall Mount Selection: Several types of wall mounts are available, each offering different features and functionalities. These include fixed mounts, tilting mounts, and full-motion mounts. Fixed mounts are the simplest and most affordable option, holding the TV flush against the wall. Tilting mounts allow for slight vertical adjustments, reducing glare and improving viewing angles from different positions. Full-motion mounts offer the greatest flexibility, allowing the TV to be extended, swiveled, and tilted, providing optimal viewing angles from almost any location in the room. The choice of mount depends on individual needs and preferences.
Hardware Verification: Once the wall mount is selected, it is essential to verify that all necessary hardware is included. This typically includes mounting screws, wall anchors (if needed), spacers, and washers. The screws provided with the mount may not always be the correct size or type for the specific Vizio 55 inch TV model. Consulting the TV's user manual or the Vizio website is recommended to determine the appropriate screw sizes and lengths. If the included hardware is insufficient, replacement screws and anchors can be purchased from a hardware store.
Required Tools: A comprehensive set of tools is essential for a successful wall mounting project. These tools typically include:
- Stud finder: To locate wall studs.
- Level: To ensure the TV is mounted straight.
- Drill: To create pilot holes and drive screws.
- Screwdriver: Phillips head and potentially flathead, depending on the screws.
- Socket wrench: For tightening lag bolts (if used).
- Pencil: For marking wall positions.
- Measuring tape: To accurately measure distances and heights.
- Safety glasses: To protect eyes from debris.
- Gloves: To provide a better grip and protect hands.
Key Point 3: Step-by-Step Installation Procedure
The actual installation process involves several key steps, each requiring careful attention to detail. Following these steps meticulously will ensure a secure and aesthetically pleasing installation.
Attaching the Mounting Brackets to the TV: Begin by carefully laying the Vizio 55 inch TV face down on a soft, protective surface, such as a blanket or padded mat. This prevents scratches and damage to the screen. Align the mounting brackets with the VESA holes on the back of the TV. Use the appropriate screws, washers, and spacers (if necessary) to securely attach the brackets to the TV. Ensure the brackets are properly aligned and tightened to the manufacturer's specifications. Over-tightening can damage the TV's housing, while under-tightening can lead to instability.
Marking the Wall Mounting Position: Using the stud finder, re-verify the location of the wall studs and mark the desired mounting height. Use the level to ensure the marked line is perfectly horizontal. Position the wall plate of the mount against the wall, aligning it with the marked line and stud locations. Use the pencil to mark the pilot hole locations for the mounting screws or lag bolts. Double-check the alignment and stud locations before proceeding.
Drilling Pilot Holes and Attaching the Wall Plate: Using the drill, create pilot holes at the marked locations. The size of the pilot hole should be slightly smaller than the diameter of the mounting screws or lag bolts. For drywall installations, use appropriate wall anchors designed to support the weight of the TV and mount. For brick or concrete installations, use masonry drill bits and appropriate anchors. Align the wall plate with the pilot holes and securely attach it to the wall using the screws or lag bolts. Ensure the wall plate is firmly anchored and level.
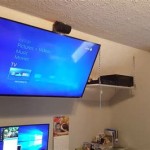
Hanging the TV on the Wall Plate: Carefully lift the TV with the attached mounting brackets and align it with the wall plate. Depending on the mount type, there may be hooks or slots on the brackets that need to engage with corresponding features on the wall plate. Ensure the TV is securely seated on the wall plate before releasing it. Most mounts have a locking mechanism to prevent the TV from accidentally dislodging. Engage the locking mechanism according to the manufacturer's instructions.
Cable Management and Final Adjustments: Once the TV is securely mounted, connect all necessary cables, such as HDMI cables, power cords, and antenna cables. Use cable ties or cable management sleeves to organize and conceal the cables for a cleaner appearance. Make any necessary adjustments to the TV's tilt, swivel, or extension, depending on the type of mount used. Verify that the TV is level and securely attached to the wall before completing the installation.
Troubleshooting Tips: If the TV is not level, loosen the screws on the wall plate slightly and adjust the position until it is level. Then, re-tighten the screws securely. If the TV is not securely attached to the wall plate, double-check the engagement of the locking mechanism and the tightness of the mounting screws. If the wall anchors are pulling out of the drywall, consider using larger or stronger anchors, or relocate the mount to a different stud location.

Secu Full Motion Tv Wall Mount For Vizio 24 28 32 37 39 40 42 43 47 48 49 50 55 Lcd Led Plasma Tilt Swivel Hdtv Cb6 Wal Com

Secu Tv Wall Mount For Vizio 32 39 40 43 48 50 55 Inch D40f E1 D43 E2 D43n D48 D0 D50n D50u D1 E50 E3 M50 P50 C1 E55 D55 D2 E0 Flat Panel Screen Lcd Led

Secu Full Motion Tv Wall Mount For Most 26 55 Vizio D48n E0 E55 D0 M55 E2 Led Lcd Plasma Tilt Bracket Bgr Wal Com

Vizio V Series 55 54 5 Diag 4k Hdr S Tv

Mount It Slim Tilting Tv Wall Bracket For 32 55 Inch Samsung Sony Vizio Lg Sharp Tvs With Low Profile Design Up To Vesa 600x400mm Black

Vizio V Series 55 54 5 Diag 4k Hdr S Tv V555 H1

Secu Heavy Duty Full Motion Tv Wall Mount Articulating Bracket For Vizio 50 55 60 65 70 75 80 Inch Led Lcd Plasma Hdtv D65 E0 E65 E1 M65 P65 E70 E3 M70 M75

Mount It Tilting Tv Wall Bracket For Samsung Sony Vizio Lg Panasonic Tcl Element 32 40 42 47 50 55 60 65 Inch Tvs Vesa 200x200 400x400 600x400 750x450 Compatible Premium Tilt 175 Lbs Capacity Newegg Com

How To Wall Mount A Vizio P Series Tv

Full Motion Tv Wall Mount For Samsung Vizio Sharp Lg Tcl 32 37 40 42 43 49 50 55