Wall Mount AC Unit Installation: A Comprehensive Guide
Wall mount air conditioning units, often referred to as ductless mini-split systems, offer a versatile and efficient solution for cooling individual rooms or small spaces. Unlike central air conditioning systems that rely on ductwork, wall-mounted units provide targeted cooling, minimizing energy waste and offering greater control over the temperature in specific areas. Proper installation is paramount to ensuring optimal performance, longevity, and energy efficiency. This article provides a comprehensive guide to the process of installing a wall mount AC unit, covering essential considerations, preparations, and step-by-step procedures.
Prior to undertaking the installation process, it is crucial to understand the fundamental components of a wall mount AC unit. The system generally comprises two main parts: an indoor unit (air handler) and an outdoor unit (condenser). The indoor unit is mounted on an interior wall and is responsible for circulating cool air into the room. The outdoor unit houses the compressor, condenser coil, and fan, and is typically placed on an exterior wall or ground-level pad. Refrigerant lines, electrical wiring, and a condensate drain line connect the two units. Installation involves carefully positioning both units, establishing these connections, and ensuring proper sealing and insulation.
Key Considerations Before Installation
Before initiating the installation process, several critical factors must be carefully considered. These considerations will significantly impact the performance, efficiency, and overall satisfaction with the installed unit.
Selecting the Right Size and Type: Determining the appropriate BTU (British Thermal Unit) rating for the space is crucial for effective cooling. An undersized unit will struggle to cool the room adequately, while an oversized unit may cycle on and off frequently, leading to energy inefficiency and discomfort. Factors to consider when calculating BTU requirements include room size, insulation levels, window area, ceiling height, and the number of occupants. Consult reputable online BTU calculators or seek professional advice to determine the optimal BTU rating for the specific application. Furthermore, consider the specific features and functionality required, such as heating capabilities, dehumidification modes, and smart home integration options. Different models offer varying levels of efficiency and noise reduction; selecting a unit that aligns with specific needs and budget constraints is essential.
Choosing an Appropriate Location: The location of both the indoor and outdoor units significantly impacts the system's performance and aesthetic appeal. The indoor unit should be mounted on a wall that allows for unobstructed airflow throughout the room. Avoid locations behind furniture or near heat sources. Ideally, the unit should be positioned centrally within the room to ensure even distribution of cool air. The outdoor unit should be placed in a location that provides adequate ventilation and is easily accessible for maintenance. Avoid placing the unit in direct sunlight or in areas prone to excessive dust or debris. Local building codes and manufacturer's recommendations regarding clearance requirements should also be strictly adhered to. Consider noise levels when selecting the outdoor unit location, ensuring that it does not disturb neighbors or occupants.
Compliance with Local Codes and Regulations: Before commencing installation, thoroughly research and understand all applicable local building codes, electrical regulations, and environmental guidelines. Many municipalities require permits for HVAC installations, and failure to obtain the necessary permits can result in fines and delays. Ensure that the electrical wiring and circuit breakers are adequate to handle the unit's power requirements. Adherence to environmental regulations is crucial, particularly regarding the handling and disposal of refrigerants. It may be necessary to engage licensed HVAC professionals to ensure compliance with all applicable regulations and codes.
Preparing for Installation
Proper preparation is essential for a smooth and successful installation process. This involves gathering the necessary tools and materials, preparing the installation site, and ensuring that all safety precautions are in place.
Gathering Tools and Materials: A comprehensive toolkit is required for wall mount AC unit installation. Essential tools include a drill with various drill bits (including masonry bits for drilling through exterior walls), a level, a stud finder, a refrigerant line flaring tool, a vacuum pump, a manifold gauge set, a pipe cutter, a wrench set, screwdrivers, wire strippers, and a multimeter. Materials required include refrigerant lines (typically copper), electrical wiring, condensate drain tubing, insulation tape, wall mounting brackets, screws, anchors, sealant, and refrigerant. It is recommended to use high-quality materials that are specifically designed for HVAC applications.
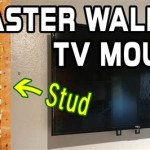
Preparing the Installation Site: The installation site must be thoroughly prepared before commencing the installation process. This involves identifying and marking the location for the indoor and outdoor units, ensuring that the wall is structurally sound and free from obstructions, and protecting the surrounding area from dust and debris. Use a stud finder to locate wall studs and ensure that the mounting brackets are securely anchored to the studs. If drilling through an exterior wall, carefully inspect the area for electrical wiring or plumbing to avoid damaging them. Cover the floor and furniture with drop cloths to protect them from dust and debris. Consider the aesthetic impact of the installation and ensure that the unit is positioned discreetly and professionally.
Ensuring Safety Precautions: Safety should be a top priority throughout the installation process. Always disconnect the power supply to the electrical circuit before working on any electrical components. Wear appropriate personal protective equipment (PPE), including safety glasses, gloves, and a dust mask. Exercise caution when working with power tools and refrigerant. Refrigerant can cause frostbite and other injuries if handled improperly. If unsure about any aspect of the installation process, seek professional assistance. Follow all manufacturer's safety guidelines and recommendations.
Step-by-Step Installation Procedure
The following provides a detailed step-by-step procedure for installing a wall mount AC unit. It is important to note that this is a general guide, and specific instructions may vary depending on the manufacturer and model of the unit. Always refer to the manufacturer's instruction manual for detailed installation instructions.
Mounting the Indoor Unit: Begin by attaching the wall mounting bracket to the wall, ensuring that it is level and securely anchored to wall studs. Use appropriate screws and anchors to secure the bracket firmly. Carefully lift the indoor unit and align it with the mounting bracket, ensuring that it is properly seated. Connect the refrigerant lines, electrical wiring, and condensate drain line to the indoor unit, following the manufacturer's instructions. Ensure that all connections are tight and secure to prevent leaks. Insulate the refrigerant lines to minimize heat loss and condensation.
Mounting the Outdoor Unit: Position the outdoor unit on a level surface, either on a concrete pad or on mounting brackets attached to the exterior wall. Ensure that the unit is level and securely anchored. Connect the refrigerant lines and electrical wiring to the outdoor unit, following the manufacturer's instructions. Use a vacuum pump to evacuate the refrigerant lines and remove any air or moisture. Open the refrigerant valves and allow the refrigerant to flow into the system. Check for leaks using a leak detector. Connect the electrical power supply to the outdoor unit, ensuring that the voltage and amperage are correct.
Connecting Refrigerant Lines and Electrical Wiring: The connection of refrigerant lines and electrical wiring requires precision and care to ensure proper function and safety. Copper refrigerant lines must be carefully flared to create a leak-proof seal at the connection points. Use a refrigerant line flaring tool to create properly flared ends. Electrical connections should be made following the manufacturer's wiring diagrams and local electrical codes. Ensure that all wires are properly secured and insulated to prevent short circuits or electrical hazards. Use wire connectors and electrical tape to insulate all exposed wires.
Testing and Final Adjustments: After completing the installation, thoroughly test the system to ensure that it is functioning properly. Turn on the unit and check for proper cooling and airflow. Monitor the temperature of the air coming from the indoor unit. Check for any unusual noises or vibrations. Use a manifold gauge set to check the refrigerant pressure and ensure that it is within the manufacturer's recommended range. Make any necessary adjustments to the refrigerant charge or fan speed. Inspect the condensate drain line to ensure that it is draining properly. Verify that the unit is responding correctly to the thermostat settings.
Addressing Common Installation Challenges: Installation can present various challenges, including difficult wall materials, limited space, or unexpected obstacles. Drilling through particularly hard materials, such as concrete or brick, may require specialized drill bits and techniques. When dealing with limited space, careful planning and creative solutions may be necessary to position the indoor and outdoor units effectively. If unexpected obstacles, such as plumbing or wiring, are encountered, it is crucial to reroute the refrigerant lines or electrical wiring to avoid damaging them. Consulting with experienced HVAC professionals is recommended when encountering challenging installations.
Maintenance and Servicing: Regular maintenance is crucial to ensure the longevity and optimal performance of the wall mount AC unit. This includes cleaning the air filters regularly (typically every one to three months), cleaning the condenser coils, and inspecting the refrigerant lines for leaks. Schedule professional servicing at least once a year to ensure that the system is functioning properly and to identify any potential problems before they escalate. Professional servicing typically includes checking the refrigerant charge, cleaning the coils, inspecting the electrical components, and testing the system's performance. Proper maintenance will help to extend the lifespan of the unit and minimize energy consumption.

How To Install A Mini Split The Home

How To Install A Ductless Mini Split Air Conditioner This Old House Youtube

Diy Wall Ac Upgrade How To Install Mr Cool Ductless Mini Split Units

Can You Install Your Own Mini Split System

How To Install A Mini Split The Home

Split Air Conditioner Installation Step By 2024 Actual Cost

9 Factors To Consider When Ing A Wall Mounted Air Conditioner

Hvac Installation Mounting A Mini Split Condensing Unit On Brick Wall Ac Mount Bracket Diy

How To Install A Ductless Mini Split Air Conditioner This Old House Youtube

The Pros Cons Of Using An External Air Conditioner Wall Bracket To Mount