Wall Mounting A 55 Inch TV
Mounting a 55-inch TV on the wall is a great way to save space and improve your viewing experience. However, it is important to do it properly to ensure that your TV is safe and secure. Here are the steps on how to wall mount a 55-inch TV:
1. Gather Your Materials
Before you begin, you will need to gather the following materials:
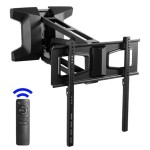
2. Choose the Right Wall Mount
There are many different types of wall mounts available, so it is important to choose one that is compatible with your TV. The weight and size of your TV will determine the type of mount you need. For a 55-inch TV, you will need a mount that can support at least 75 pounds.
3. Find the Studs in the Wall
Once you have chosen a wall mount, you need to find the studs in the wall where you want to mount your TV. Studs are the vertical supports that run through the wall. They will provide the most secure support for your TV.
To find the studs, you can use a stud finder. A stud finder is a device that emits a beep when it detects a stud. Once you have found the studs, mark their location on the wall with a pencil.
4. Drill the Pilot Holes
Once you have found the studs, you need to drill the pilot holes for the screws. The pilot holes should be slightly smaller than the screws you will be using. This will help to prevent the wood from splitting.
To drill the pilot holes, use a drill bit that is slightly smaller than the screws. Drill the holes about 1 inch deep into the studs.
5. Install the Wall Mount
Once you have drilled the pilot holes, you can install the wall mount. Place the wall mount over the pilot holes and secure it with the screws. Be sure to tighten the screws securely.
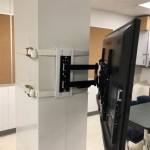
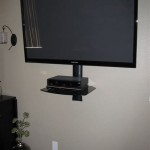
6. Hang the TV on the Wall Mount
Once the wall mount is installed, you can hang the TV on the wall mount. To do this, simply lift the TV and place it on the wall mount. The TV should click into place.
7. Level the TV
Once the TV is hung on the wall mount, you need to level it. To do this, use a level to check the TV from side to side and top to bottom. If the TV is not level, adjust the screws on the wall mount until it is level.
8. Connect the Cables
Once the TV is level, you can connect the cables. To do this, simply plug the cables into the back of the TV and then into the wall outlet. Be sure to secure the cables with cable ties or clips to prevent them from hanging down.
9. Enjoy Your New Wall-Mounted TV
Once the cables are connected, you can enjoy your new wall-mounted TV. Be sure to follow the manufacturer's instructions for using your TV and wall mount.

How To Wall Mount Your Tv X80h X90h X91h X95h Series Of 55 65 Inches Sony In

Tv Bracket Wall Mount Double Arms Ultra Strong Stable Support Lcd Led 32 55 Inch

Qualgear Universal Ultra Slim Low Profile Full Motion Tv Wall Mount Kit For Most 23 In 55 Tvs Qg Tm 021 Blk The Home

How High Should A 55 Inch Tv Be Mounted Hellotech

Pnetrome Hisense A6h 43 Inch 50 55 Tv Wall Mount Fixed Stand Base In India

Dwf2655x 26 To 55 Flat Panel Fixed Wall Mount Television Home Theater Accessories Samsung Us

Flipkart Perfect Homes Studio Tv Stand 26 55 Inch Heavy Wall Mount For Lcd Led Plasma Full Motion In India

Avf Mount Multi Position Tv Wall 32 55 Very Co Uk

Tv Wall Mount For 32 55 Inch Tilt Up To 110 Lbs Vesa 100 400mm Satmaximum

Mount It Full Motion Corner Tv Wall For 55 In Screens Mi 4481 The Home